The little things that make me happy here on Bliss Road~~Emily Keaton
Showing posts with label hearts. Show all posts

Wednesday, May 21, 2014

May DeNami Inspired By

Greetings, blog friends! Welcome to the May edition of DeNami Design's Inspired By feature! Each month we feature one talented DeNami customer's work, and then honor that wonderful artist with a host of DeNami DT projects inspired by it! This month we were inspired by Tina M.


You can read all about Tina's inspiring design right HERE.

I was inspired by five aspects of Tina's creation:
  1. the monochromatic color scheme
  2. the two-tone stamping on the focal image
  3. her use of an embossed background
  4. the layout of her design
  5. the little gemstones she used as an accent at the bottom right 
I tried to pick up all of these in my creation:


I went monochromatic, only with shades of blue {Pearlescent Sky Blue Brilliance ink} rather than black. I achieved her two-tone focal image by stamping off with the larger image in the Peacock Feathers stamp set.  I changed up the embossed background by using the funky Multi Circles embossing folder. I altered her sketch a bit by incorporating the sentiment (Medium Double Circle, Thank You Circle, and a heart from the Hearts stamp set) into the focal image panel. And finally, I riffed on Tina's trio of gemstones by embellishing the center of each circle in my embossed background with a pearl drawn on with a 3D Crystal Lacquer Pearl Pen.

Be sure to head over to the DeNami Design blog today to see how the rest of the team was inspired by Tina's lovely creation!

Thanks so much for visiting today. May your day be filled with bliss!
Emily

Friday, February 14, 2014

Happy Valentine's Day!


Hello and Happy Valentine's Day! I'd really hoped to write up this post yesterday (at the latest) and schedule it to go live much earlier today, but between having a husband home sick for two days this week and another Nor'easter winter storm that cancelled school yesterday, I didn't have much alone time to finish my top-secret Valentine's Day projects or get them photographed for a blog post. So, finally, everything is pretty much back to normal at my house, and I spent the morning putting the finishing touches on some Valentines and gifts for my family. It will be fun to surprise everyone at suppertime tonight!

I know that some folks pan Valentine's Day as an overly romantic, Hallmark-fueled holiday, but I really and truly love it! It gives me an event-kind-of-something to look forward to in the otherwise dreary, cold, and frozen month of February. The pretty colors (reds! pinks! lavenders!) are such bright spots in the colorless winter landscape, and the fun shapes/motifs (hearts! cupids! doilies! arrows!) and loving sentiments are true pick-me-ups. And how can you go wrong with a holiday that is rooted largely in chocolate? I say bring it on!!

I love giving Valentines! I give them to my husband and kids, but also send them to my parents, sister's family, in-laws, aunts and uncles, and friends all over the country. For me, Valentines are just such a fun way of sending a little love and letting the folks I care about know that I've been thinking of them. I spent a large chunk of my day on Monday getting my Valentines ready to mail: signing, stuffing and sealing envelopes, addressing, weighing and attaching proper postage, and then heading off to the post office to get them in the mail system before the end of the day. My fingers are crossed that everything will be delivered in time! Yes, it is a labor of love, but it makes me feel good, and I hope that a little something that I took the time to make and send will brighten the day of those I care about.

Over the years I've collected a number of small empty heart-shaped candy boxes, and I decided that instead of buying treats to give for Valentine's Day, I'd upcycle a few of my heart-shaped boxes and fill them with some homemade chocolate candies. Here are the boxes I decorated:

For my dad:

From DeNami Design: Dad stamp, Elegant Oval Frame stamp, heart from Whimsical Valentine stamp set, Chevron embossing folder, and Black Chevron washi tape

What's inside? Some hand-dipped Dark Chocolate Vanilla Creams!

I based these on this recipe from Land O Lakes.

For my mom:

From DeNami Design: Small Valentines Script stamp, Solid Rose Accents stamp set, and Red Heart Lace washi tape.

Wanna peek at what she'll be biting into? Milk Chocolate Peanut Butter Balls!

I based these on this recipe from Parents Magazine (February 2011).

I have a punch art penguin-themed box for my hubby:
 
From DeNami Design: Square Word Bubble stamp, Love Sentiments stamp set, and heart from Whimsical Valentine stamp set.

a punch art owl-themed box for my 15YO daughter (to go with this card for her):

From DeNami Design: Square Word Bubble stamp

and a Despicable Me minion-themed box for my 11YO son:

The patterned paper is from Target's One Spot, and I printed the sentiment with my computer.

to go with the minion Valentine I made for him (I was inspired by this minion Valentine):

From DeNami Design: Small Valentines Script stamp, Love Sentiments stamp set, Small Heart Outline stamp, Small Scallop Heart stamp, chevron border from Modern Borders Set, and two white Boutique Buttons.


I can't wait to see everyone's reactions!!

Thanks for bearing with me through this long and photo-heavy post :D! I hope that you have a lovely day today.

Happy Valentine's Day!
Emily

Saturday, February 8, 2014

Owl Be Your Valentine

Hello there! Today I have a little owl-themed Valentine to share:


Time is running out on my friend Pam's Just Punch It Challenge. Valentine punch art is this edition's theme. I'm still working on my Valentines and had a bit of time to play with paper today, so I dove right in. The patterned paper is from Target's One Spot. The Teeny Heart Background stamp and Rectangle Word Bubble stamp are both from DeNami Design. The branch stamp is from Schlosser Designs.

I created that cute little owl by starting with a rectangle of red cardstock and then punching part of an oval to create his tufted head and using corner rounder to shape his base. I used various sizes of heart punches to make his tummy, beak, and feet. His eyes are, of course, layered circle punches, and his wings are two halves of a small scalloped circle punch. He was so easy to make!

I simply used my computer to print the sentiment on cardstock and then used my Stamp-a-ma-jig to stamp the word bubble around it.

Thanks for stopping by!
Emily

Friday, February 7, 2014

Photo Tutorial: Shaped Cards

It's my turn to share another photo tutorial over on the DeNami Design blog today. This time I'm giving tips on making shaped cards--you know, anything besides a square or rectangular card base! Because it's February and Valentine's Day is right around the corner, I'm showing how to make a heart-shaped card. Be sure to check out the DeNami blog for all the details.


Thanks for stopping by today for this little peek of my photo tutorial. I hope you have a wonderful weekend!
Emily

Thursday, February 6, 2014

DeNami Design ~ Clean and Simple Valentine

Hello there, friends! It's my turn to share a project over on the DeNami Design blog today. I made a quick and easy, clean and simple Valentine featuring a fabulous embossing folder from the DeNami Design store. I hope you'll swing by to take a peek and tell me what you think! Here's a little preview:


Thanks for stopping by! Have a day filled with bliss,
Emily

Thursday, January 30, 2014

My first Embossed Elements winner!

Greetings, friends! I hope you are keeping toasty wherever you are. We woke to yet another frosty morning here, and while it certainly hasn't been as cold here as elsewhere in North America these days, I'm pretty sure I'm done with the cold. Between the low temps and the wind chills, it just hasn't been safe for our regular to/from-school walks with my youngest each day. I miss them!

And speaking of warm, thank you so much for your very warm reception of my new monthly Embossed Elements feature for the DeNami Design blog! I loved reading all of your comments :D.

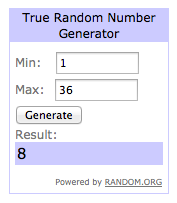
On my Monday Embossed Elements post I promised to return today with a winner of my embossing folder giveaway, and here I am to do it! I used random.org to pull a winning commenter:


That corresponds to commenter #8, which was Brenda in IN!! Congratulations, Brenda!! I'll be in contact with you shortly to get your mailing information :)

I've got a long to-do list today, but before I rush off, I'll leave you with a little more Embossed Elements inspiration featuring the lovely Layered Hearts embossing folder that Brenda has won:


I almost always reach for reds and pinks when making a Valentine card, so I challenged myself to do something a little different. It's clean and simple for the most part, but I loved letting the heart texture take center stage. And using lavender and celery together makes my heart happy (and hopeful for spring!!!). The stamps I used are from DeNami Design: Love Script and this teeny floral heart from the Whimsical Valentine stamp set.

Thanks so much for stopping by today! Keep warm!
Emily

Wednesday, January 29, 2014

DeNami Design ~ Love Gift Bag

Hello there, friends! It's my turn to share a project over on the DeNami Design blog today. I put together a fun little gift bag for Valentine's Day. I hope you'll swing by to take a peek and tell me what you think! Here's a little preview:


Thanks for popping in! Here's hoping you'll have a day filled with bliss,
Emily

Monday, January 27, 2014

My Brand-New DeNami Feature: EMBOSSED ELEMENTS + a GIVEAWAY


Hi there, everyone! I'm here today with the very first installment of my new regular monthly feature for the DeNami Design blog. With today's post I'm starting a series called Embossed Elements that highlights all of the wonderful new embossing folders being carried in the DeNami Design store. If you haven't checked these out yet, you should! You won't believe all of the variety in this collection: the DeNami store carries an amazing 142 different embossing folder designs!!

Now, I do have a confession to make. While I've been papercrafting for nearly 10 years now, I've only just acquired my very first diecutting machine (thank you, Santa!!). So for the first time ever, I'm able to dabble with embossing folders! I wasn't completely sure that embossing folders would be for me, but in the short time that I've been playing with the embossing folders that DeNami carries, I've become completely addicted to them! I love the fabulous texture that they add to my creations--everything is so crisp, and the designs are deep. They really stand out! And I can't believe how much visitors to my blog comment on the embossing I've been featuring on projects I've posted there lately. It must be really noticeable!!

So whether you are brand new to embossing folders like me, or an old pro, I'm hoping that my Embossed Elements feature will help you learn your way around DeNami's new collection of embossing folders--and maybe even give you some new ways to use or think about embossing!

Today I'm sharing with you two different projects for Valentine's Day, and both feature the very festive Layered Hearts Embossing Folder from the DeNami store. One thing I really love about this embossing folder is that, while many of the embossing folders in DeNami's collection are clearly designed for the portrait orientation, this one is perfect for the the landscape orientation. Let's take a look:


For this first project, I started with a panel of red cardstock and punched the bottom edge using the EK Success Deco Scallop border punch and then ran it through my Big Shot in the Layered Hearts Embossing Folder. I matted this embossed layer with white cardstock and then mounted the whole enchilada on a pink card base.

Next I added a pink cardstock panel that I had embossed with another Valentine gem from the DeNami embossing folder collection: the Heart Embossing Folder. I really like the look of both of these embossed patterns layered on top of one another!

I stamped the Elegant Word Plate on white cardstock with Onyx Black Versafine Ink, and used my Stamp-a-ma-jig to align the pretty Sending You Love sentiment, stamped in Satin Red Versafine Ink, right smack dab in the middle. I decided to glam up my focal point just a bit with some gorgeous Ruby Red Sparklets Glitter adhered inside the loops of the word plate with a Quickie Glue Pen. A quick fussy cut was all I needed to get this ready for attaching to my card. I finished off my design with a simple red grosgrain bow.

My second card is a reminder that embossing folders are perfect for adding texture not only to rectangular panels, but also any precut shape you care to pretty up!


For this card, I started with a pink heart diecut, embossed it with the Layered Hearts Embossing Folder, and layered it on a heart-shaped card base die cut from red cardstock with a larger nested heart die.

Next I built my very own cupid's arrow embellishment with a wooden craft stick, a wooden veneer heart shape, and some bits of chipboard. I colored the wood bits red using a Faber-Castell Gelato and rubbed the color into the woodgrain with my fingertips. I trimmed angled fringe into two bits of chipboard to make the arrow's feathery fletching and colored them with a white Gelato. After gluing all the bits together to form my arrow, I outlined the heart-shaped arrowhead with dimensional dots drawn on with a white Crystal Lacquer Pearl Pen

Finally, I stamped the Love Flourish sentiment on white cardstock with Tuxedo Black Memento ink, trimmed out the sentiment, colored in the heart-shaped O with a red Copic marker, and adhered it to the card with some foam tape. Done!

I hope that this opening installment of Embossed Elements has given you some ideas for using embossing on your Valentine cards!


How would you like the chance to win this beautiful Layered Hearts Embossing Folder? I have one up for grabs in an Embossed Elements giveaway! Want to be in the running? Just leave me a comment on this post using the word "HEART." There's no need to be a follower of my blog to enter, but if you are a follower (or become a new follower!), you can have a second entry in the drawing--just leave me a second comment telling me that you are a follower and how you follow. :)

I'll leave commenting open until 11:59 p.m. EST on Wednesday, January 29, 2014, and will draw one commenter at random. The winner will be announced right here on my blog on Thursday, January 30, and if I'm able to find an email address, I'll be sure to contact the winner as well.

Thanks for joining me today!
Emily

Wednesday, January 22, 2014

DeNami Design Product Spotlight January Blog Hop

It's the fourth Wednesday of the month and that means it is time to show off another awesome DeNami Design stamp with a blog hop! This month we are featuring the versatile Love Circle stamp.


This stamp is perfect for Valentine's Day, but it's also great for so many other occasions: anniversaries, weddings, new babies, birthdays, etc. But because I'm building up a cache of Valentine cards to send out before long, I just had to go with a good ol' Valentine card:


I started with a red card base and layered on a panel of solid turquoise that came with a pack of Valentine patterned paper that I picked up at the Target One Spot recently. I gave that a faux stitched border with a white gel pen. Next I adhered a panel of patterned paper from that same Target pack that I'd punched with the EK Success Diamond Lace border punch from the DeNami store.

And now we get to the good stuff--the stamping! I stamped the Love Circle in turquoise three times on white cardstock and then filled each circle with a dotted heart from the Hearts stamp set stamped in Satin Red Versafine ink. All that was left then was to punch out the circles, mat them on red circle punches, and adhere them with a bit of foam tape. I tied on a bit of red/white baker's twine from the Classic Twine 3-pack as a simple bow for a final touch.

I know that the rest of the design team came up with some fantastic inspiration for this stamp! You should definitely go and take a peek at the cool things they did--and what better way than with a blog hop! If you hop along with us today, I'll have a chance to win your very own Love Circle stamp, so be sure to leave comments along the way.

DeNami blog 
Lisa Petrella
Deb Wabbe
Wendy Elliot
Emily Keaton  <==== you are here!
Lisa Elton
Pattie Goldman
Dana Seymour
Tammy Hobbs

One commenter will be selected at random to win this month's prize! Just check out the DeNami blog for all the details.

Thanks for checking in today!
Emily

Saturday, January 18, 2014

Dots With Love

It's been a long time since I posted on a Saturday! It was a snowy day, and I was feeling crafty. So I stayed indoors and got busy in my crafting area. Yay for me!

I've been intrigued by this week's CASology challenge: DOT all week long. An idea had been forming for a couple of days, and I finally got a chance to get it all arranged on paper.


All of my design elements come from DeNami Design: dotted heart from Hearts stamp set, Large Dot Swirls, "with love" from Love Sentiments stamp set, Ruby Red Boutique Buttons, Red/White Dots washi tape, and White cardstock.

Well, my snow removal crew has just returned from their outdoor duties, so I've got to wrap this up and help get snacks and hot cocoa--and then concentrate on getting some supper on the table. I've had some chicken in the crockpot all day, and boy, does the house smell good!!!

I hope you've had a lovely Saturday! Thanks so much for dropping by,
Emily  

Wednesday, January 15, 2014

DeNami Design sponsors Curtain Call Challenge

Good morning, friends! DeNami Design is proudly sponsoring the brand-new Curtain Call Challenge, which starts today, and the DeNami design team is excited to be playing along! This Curtain Call is all about Love Letters:


DeNami Design is offering up a fabulous prize to the winner of this Curtain Call Love Letter challenge. Check it out:


Wouldn't that be a wonderful bonus? Just think of all the fabulous DeNami goodies that you could treat yourself to with a nice GC like that! I hope you'll play along :D.

Here's how I was inspired by the Love Letters theme:


I used three different DeNami Design stamps (Sending You Love, Teeny Heart Background, and Large Dots Swirl), plus two different DeNami Design washi tapes (White/Red Hearts, and Heart Clouds). I crafted a little envelope out of a glassine bag and filled it with some heart-shaped confetti. This design makes me so happy!

Be sure to see what the rest of the team created for this challenge with DeNami products, and check out the Curtain Call and DeNami sites today, too!

Thanks for stopping by today!
Emily

Monday, January 13, 2014

Friends Warm the Heart

It has been soooooooooo long since I've created anything with my Flourishes stamps. I love them so and have always enjoyed playing along with the Flourishes challenges, but life got to be too, too busy recently to do it all. I spotted the most recent Timeless Tuesday challenge, all about shaped cards, last week. I tucked it away in the back of my mind for a while and finally took a little time today to make a little something for it.

This is a very simple card, but it was lovely to be creative, even if for just a little while.


I used two nested heart-shaped cookie cutters as the pattern for my heart-shaped card and the nested white heart-shaped panel (and then cut them both out by hand). The image comes from the Flourishes set Joy is in the Air, and the sentiment is from the Flourishes set Warm Winter Wishes (which appears to now be retired?). I colored the image with my Copics and added a sweet little felt heart sticker that I picked up in a 10-pack at Target's One Spot last week. It will be perfect to send to a friend for Valentine's Day.

The kids will be home from school soon, so I've got to get this posted before I get completely distracted {in a good way, of course! ;) }.

Hope you've had a great start to this new week! Thanks for dropping by,
Emily

Sunday, January 12, 2014

DeNami Valentine Blog Hop

Who's ready for Valentine's Day? I myself am just getting started on making Valentine cards, so today's January blog hop is just in the nick of time. It's all about inspiration for Valentine's Day!!


Hopefully, you've arrived here by way of Deb Fischer's blog, Paws-itively Yours. If so, you are on the right track! If not, you'll want to head over to the DeNami blog to start the blog hop at the beginning. (And remember, if you get lost along the way, you can always head over to the DeNami blog to get pointed in the right direction.)

Don't forget, there are some super-fun DeNami prizes to be won! Two lucky commenters will be drawn at random from among the comments left along the blog hop to win a $20 DeNami Design gift certificate! You have until Monday, January 13, 2014, 11:59 pm PST, to leave comments on all the blogs to be eligible for a prize. 


Here's the Valentine I made for today's hop:


I used the lovely Small Valentines Script stamp, Elegant Oval Frame stamp, Satin Red Versafine ink, Deep Lagoon Versafine ink, Dotted Scallop Border punch, Heart embossing folder, Silver Rhinestones, and baker's twine from the Confetti Twine 3-pack, all from the DeNami Design store. The patterned paper and solid purple paper are from a pack of scrapbook paper I picked up in the Target dollar section last week.


it's time for me to send you along on your way. But before you leave for more DeNami Valentine inspiration, be sure to leave a comment to be eligible for the randomly drawn prizes.  Then you can head out to see the next blog hop participant on today's list: Linda Carpenter
 
Thanks so much for stopping by today! Enjoy the blog hop,
Emily

Wednesday, January 8, 2014

DeNami Design Happy Monsters Sneak Peeks

Welcome to Day 3 of the DeNami Design Spring/Summer 2014 Release Sneak Peeks!! Today DeNami DT Member Tammy Hobbs and I are giving you sneak peeks of brand-new DeNami stamps about to be released on January 10!! Today's sneak peeks are in a brand-new category of DeNami stamps: it's the HAPPY MONSTERS! Be sure to read all the way to the end of this post for details on a great giveaway :D.


These little monsters definitely aren't the spooky kind {wink}. Let's see what kinds of projects you can make with them:

1) My first project is a Father's Day card! I used two cute little happy monsters from two new stamps, E173 Happy Monster w/Balloons and N146 Happy Monster Party. I stamped and fussy cut a large monster from the Happy Monster Party (leaving off his party hat). I also fussy cut the smaller monster, leaving off his party hat and balloon so the daddy monster and kid monster could hold hands! I also used the DeNami Happy Father's Day sentiment, Tuxedo Black Memento ink, Teal Chevron Washi Tape, and one of the new Chevron Embossing folders carried in the DeNami store.


2) My second project is a perfect card for saying hello to a far-off friend! It features the new I69 Happy Monsters in Car stamp, as well as the new E175 Balloon Trio. My card design was perfect for pairing up with the Sending You Smiles sentiment. And doesn't the Cloudy Sky embossing folder make a great background for my road-trip scene?


3) And finally, for my third project, I turned the new N146 Happy Monster Party stamp into a Valentine's Day card! I also used the brand-new F240 You Make Me Feel sentiment and some hearts from the Whimsical Valentine stamp set. Isn't it perfect? And so is the Layered Hearts embossing folder that I used as my on-theme background.


Are you still with me? I mentioned a giveaway way back at the beginning of this post. DeNami is giving away multiple gift certificates today, so be sure to leave a comment here on my post and then check out the DeNami blog for all of the different ways you can win today. :)


I'm so glad that you dropped in to check out some of the new Happy Monster stamps in the DeNami Design Spring/Summer Release! Be sure to tune into the DeNami blog tomorrow for giveaway winners and release full reveal.

Until then, have a day filled with bliss,
Emily 


Thursday, June 6, 2013

Growing In Unity~Day 4

 Thanks for coming back for Day 4 of my week as Growing in Unity gal!

Today is a two-fer day! I've got two little Unity projects that I've been just itching to share with you. Let's get started!


The sentiment is from Unity's {my thoughts are with you} kit. Definitely a must-have! It is loaded with a great variety of "thinking of you" types of sentiments that are perfect for cardmakers. I love how this one in particular fits perfectly in my Stampin' Up! modern label punch.

The patterned paper is a digital print from the Beautiful Moments collection by Carta Bella (available from JessicaSprague.com).  I built the gilt frame around the portion I printed out using some really cool gold washi tape. It totally looks like a fancy picture frame, right? I think the effect is awesome.

Now, switching gears a bit.


This card pulls together two different Unity Stamp kits. The doily stamped in the background in white on kraft and the fancy label are from the Generations kit, and the fantastic "You are fabulous" sentiment is from the Where You Should Be kit. Quick and easy and perfect for dropping in the mail to a fabulous friend!

And I think that does it for today!

Please leave a comment on this post to be in the running for two free Unity Itty Bitty kits, one comment per person please. But if you are a follower of my blog (or become a new follower), you can leave a second comment--for a second chance to win--on today's post:  just let me know that you are a follower and how you follow my blog!

Don't forget to come back tomorrow for my last GIU post. If you haven't already commented on my GIU Days 1, 2, and 3 posts, you should check out and comment on those as well to maximize your chances of winning in the random drawing. I will leave commenting open through 11:59 p.m. EDT on Sunday, June 9, 2013, and will come back on June 10 to announce the winner here on my blog. If I can find a way to contact the winner via email, I'll be sure to do that, too. :)

I'm so happy that you stopped by to visit today!
Emily 

Sunday, May 19, 2013

DeNami Fresh Florals Blog Hop

Good morning, friends! I am over the moon to be a part of today's DeNami Design blog hop! Today the DeNami Design team and DeNami Design customers are highlighting some of my very favorite DeNami stamps: florals!! I hope you'll hop along for loads of inspiration.


Hopefully, you've arrived here by way of Amy Smidebush's blog, Standing Ovation. If so, you are on the right track! If not, you'll want to head over to the DeNami blog to start the blog hop at the beginning. (And remember, if you get lost along the way, you can always head over to the DeNami blog to get pointed in the right direction.)

Don't forget, there are some amazing DeNami prizes to be won! Two lucky commenters will be drawn at random from among the comments left along the blog hop to win a $20 DeNami Design gift certificate! You have until Monday, May 20, 2013, 11:59 pm PST, to leave comments on all the blogs to be eligible for a prize.


So, let me show you what I made with one very cool and utterly versatile DeNami stamp sets, the Whimsical Garden cling stamp set.


I just love how you can build your own blooms with this set! And the flowers and leaves are perfect for coloring with your favorite media. I also used the delightful You're On My Heart sentiment, along with Golden Tangerine cardstock, Cream cardstock, Tuxedo Black Memento ink, and some White/Black Dots washi tape from the DeNami store. Oh, and I nearly forgot--see the tone-on-tone stamping done on the card base? That fabulous look is courtesy DeNami's Polka Dot Background stamp and some Versamark ink.

I recently sent this card to a friend to let her know I'd been thinking of her!


That's it for me today! Before you leave for more Fresh Florals inspiration, be sure to leave a comment to be eligible for the randomly drawn prizes and then you can be on your way to the next stop on the hop, the blog of the very sweet and talented Pattie Goldman
 
Thanks so much for stopping by today! Enjoy the blog hop,
Emily
 

Wednesday, February 20, 2013

Pinspired at DeNami

Happy Wednesday, friends! One of the new features on the DeNami Design blog this year is a little something called Pinspired. Paulina, our DT leader, has scoured Pinterest for beautiful, inspirational photos. Twice each month, the DeNami team will then interpret a given inspirational photo into various cards and projects. Paulina split the team into two groups--the first group took their turn here--and today it is time for my group to take a turn.

Here is the inspirational photo that Paulina gave us to interpret:


And here is my creation inspired by it:


Even though I took a clean and simple approach to this card, there are still four different DeNami stamps in the design: Small Heart Outline, Teeny Heart Background, You're on My Heart, and Sparkles. Can you spot them all?

I also used some musical notes washi tape from the DeNami Design store.

Be sure to check out what the rest of my DT group made after being inspired by today's Pinspired photo!

Thanks for dropping by for a visit and slice of bliss today!
Emily


Monday, February 18, 2013

Happy Presidents' Day

Today is Presidents' Day in the United States. It has a long and somewhat convoluted history (which you may read up on here, if you are so inclined), but ostensibly commemorates the birthday of George Washington, first president of the United States of America.

In memories of the Februaries of my youth, visions of arrow-pierced frilly hearts, paper busts of Abraham Lincoln and George Washington (both of whom were born in February), cupids, and cherry pies will be forever entwined. Yes, I included cherry pie in that list. Remember the myth that when George Washington chopped down a cherry tree as a youngster, he responsibly fessed up, "Father, I cannot tell a lie; I chopped down the cherry tree"? Over the years, February became the time for baking cherry pies to honor Washington's birthday--and it was no different in my house. My mom often baked a cherry pie (or two) in February to celebrate--whether it was Washington or the incomparable goodness of the tart red cherry we were celebrating, I'm not sure we knew. But cherries and February go together like a horse and carriage in my mind.

And somehow cherries migrated to an association with Valentine's Day for me, as well. I remember going to our town's Ben Franklin five-and-dime store in the 1970s and 1980s to buy cherry sours candy by the pound from the candy counter. They were only available in February, so that became a Valentine's Day treat. When I started to learn how to bake as a teen, I made my share of cherry cobblers (so much easier to master than pie!) as a special Valentine's Day dessert for my family--those February cherries always fit the "red" theme of the meal I planned for that night.

So now my Valentine/February cherries live on. Recently it has become my tradition to bake my sweet hubby a cherry pie for Valentine's Day. Conveniently, his favorite dessert is cherry pie, and since he is as sweet as cherry pie, it fits into my vision of a cherry-laced February--and all is right with the world. :) I took time last Thursday morning to bake his traditional cherry pie and couldn't have been more pleased with the results!! Probably the best cherry pie I've ever made, so I couldn't resist taking a few photos--just in case my pies never again turn our quite this perfect ;).


Presidents' Day doesn't seem to be such a big deal any more. Elementary schools (or at least my kids' schools) aren't decorated with a profusion of cupids and presidents' heads in February, and Presidents' Day seems to be more about big auto sales than cherry pies these days. But in case you'd like to revisit the Presidents' Day cherry pie tradition, I'm sharing my recipe here. And don't forget--there's no statute of limitations on cherry pies. You can make one any time it tickles your fancy!!

Tart Cherry Pie

3/4 cup granulated sugar

3 Tbsp. corn starch

1/4 tsp. cinnamon

2 cans (14.5 oz. each) red tart cherries in water

1/4 tsp. almond extract

1/3 Tbsp. butter

2 crusts for a 9-inch pie (I use Pillsbury refrigerated pie crusts)

Red decorating sugar

Preheat oven to 450 degrees F. Drain the cherries and reserve the juice from only one can. In a saucepan, combine sugar, cornstarch, and cinnamon. Stir in reserved cherry juice. Cook over medium heat, stirring constantly until mixture boils and thickens. Remove from heat. Add the almond extract and gently stir in drained cherries, being careful not to mix in extra cherry juice--I recommend lifting the cherries from their drainer by the spoonful, rather than dumping in the entire mass at once. Pour filling (it may be slightly runny at this point, but will thicken perfectly while baking) into pastry-lined glass pie pan. Dot with butter. Use heart-shaped cookie cutters to cut vent holes (four work perfectly!) in the top crust, place across top of pie, tuck excess top crust under the edges of the bottom crust, press together to form thick crust edge, and flute. Sprinkle pie with decorative red sugar. Bake 15 minutes, then cover edges with aluminum foil (or use a silicone pie crust shield like this one as I do), and return to oven to bake for an additional 15 minutes. Cool pie for several hours to allow filling to thicken before slicing. Serves 8.

***************

Now, remember how I said last week (in this post) that I wasn't exactly sure how much snow we had gotten here in the big Blizzard of 2013? Well, we got the official scoop in our hometown weekly newspaper last Thursday: we received a total of 28 inches!!! How about that?? I guess an awful lot of snow had been blown away from the areas I'd measured by the time I got outside to take my measurements. And here I'd been feeling cheated that our snowfall total hadn't fallen within the "advertised" totals of 24" to 30" in the weather advisories leading up to the storm. I guess I needn't have worried!! ;)

Sorry I don't have a papercrafted project to share today, but I'm hoping that a little cherry pie eye candy will make up for it. My kids are on vacation from school this week for February break, so I'm not sure how much I'll be around the ol' blog this week. But I hope to catch up with you all again soon!

Thanks so much for dropping by and sharing a little slice of {cherry pie} bliss with me today!

Emily

Tuesday, February 12, 2013

You stole my heart + a WINNER!


Happy Tuesday! I am sharing another Valentine card that I mailed out yesterday. This one is all about the stitching. The stamps are from Unity's Straight from the Heart set. To make this card, I used a twist on the regular stamp masking technique. I stamped a heart {mask} on a sticky note, trimmed it, and placed it on my design as a mask where I wanted to stitch around my "stolen" heart. After stitching, I simply removed {stole} my heart mask, resulting in an "empty" heart roughly the same size and shape as the two "filled" stitched hearts.

I am playing along with:
OK, so now on to some fun stuff! I had a little giveaway to celebrate my win in the Moxie Fab world last week. The comment period ended last night and I used random.org to draw a winner this morning.


Lucky #10 means our winner is ERIN!!


Congratulations, Erin!! I've emailed you. :)

Thank you to everyone who stopped by to offer her congratulations on my Moxie Fab win! I was tickled to read your comments and had so much fun seeing how creative you were in fitting the word "blizzard" into your responses. :-) You guys are always so much fun!

The kids are back in school today after an unscheduled four-day weekend. They had Friday off for the blizzard, and Monday off to allow time for snow removal at their schools. Even though they had a super time playing in all of our snow, it's nice to be back into our routine again.

Thanks for dropping by to share a little slice of bliss with me. :-)
Emily

Monday, February 11, 2013

I'm Nuts for You


Hey there, everybody! We survived the blizzard :). It was hard to tell exactly how much snow we got in all, what with all the blowing and drifting. We tried to take some snow depth measurements and ended up taking an average. Our best guess is that we received about 18 inches of snow in our town. Boston, just 15 miles to our south, received 24.9 inches of snow. So, who knows? We'll get the official scoop in our hometown weekly newspaper on Thursday.

I took a whole stack of Valentines to be mailed at the post office today, and this was one of them. I made it for my aunt and uncle. My uncle had a long career as a shop teacher before he retired--I think they will get a kick out of this ;). Huge thanks to my sweet hubby for supplying me with some nuts from his garage stash! The letter stamps are from Alphabetically Adorable by Unity, and the patterned paper is a digital print from the Echo Park Paper Hybrid Note to Self collection. Those are some big letters, so this card measures 5" x 7".

I'm playing along with a few challenges:

Thanks for stopping by! I'll be back tomorrow with the winner of my blog candy.

Emily