The little things that make me happy here on Bliss Road~~Emily Keaton
Showing posts with label animals. Show all posts

Monday, June 23, 2014

Embossed Elements: Cloudy Sky + a GIVEAWAY


Hi, everybody! I'm coming to you today with the June edition of my monthly Embossed Elements feature for the DeNami blog. Today I'm featuring a truly versatile item: the Cloudy Sky Embossing Folder from the DeNami store. There are just so many different ways to use this awesome design!

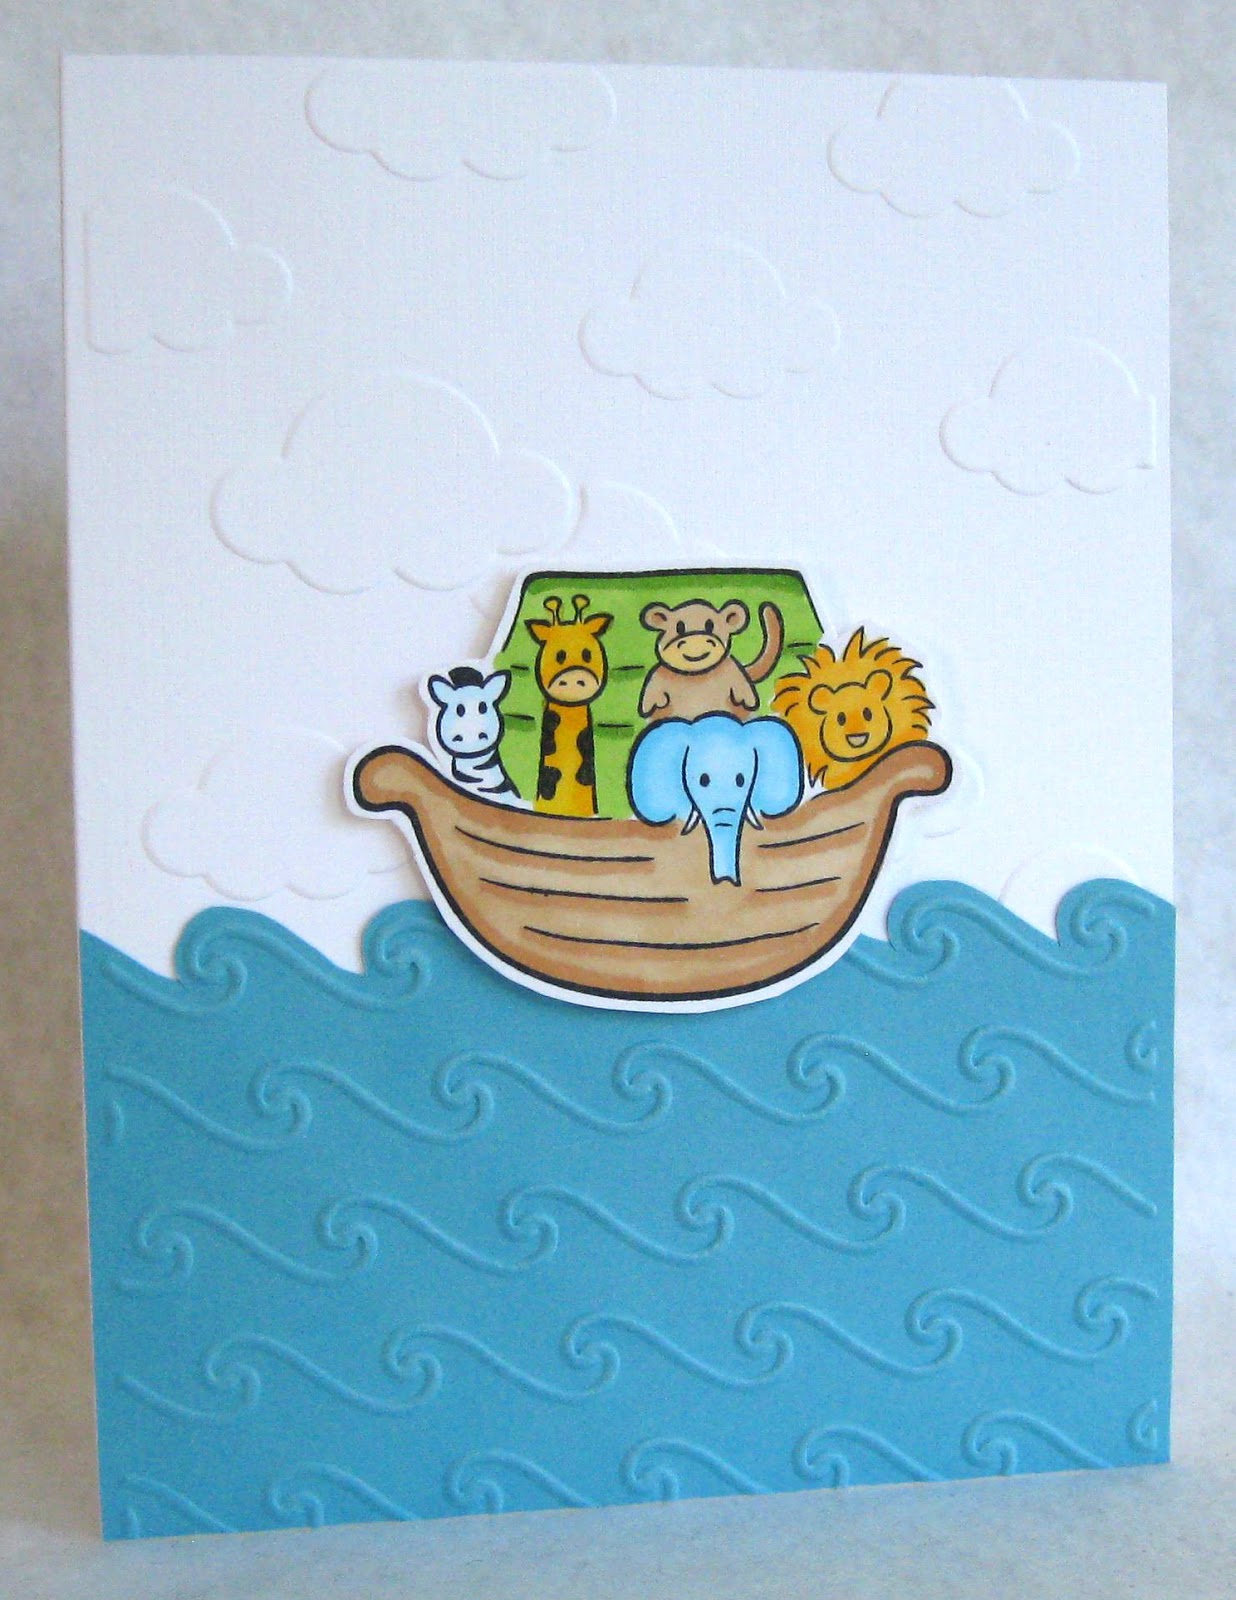
My first card is a sweet all-purpose card. It uses just one DeNami stamp (Noah's Ark), and two embossing folders: Cloudy Sky and Beach Waves. I think this would be so cute as a baby card, a baby's first birthday card, or even a thank you note for a Sunday School teacher!


My second card is perfect for the 4th of July! I again used the Cloudy Sky embossing folder as a backdrop, this time for an outdoor celebratory scene featuring Chickie in Balloon, Chickie w/ Sparkler, and Patriotic Chickie. The sentiment comes from the Everyday Greetings stamp set.


I hope this gives you some ideas you can use with the Cloudy Sky embossing folder! Thanks for taking a peek at my embossed projects today. Be sure to check out my giveaway!


How would you like the chance to win this Cloudy Sky Embossing Folder? I have one up for grabs in an Embossed Elements giveaway! Want to be in the running? Just leave me a comment on this post using the word "CLOUDS." There's no need to be a follower of my blog to enter, but if you are a follower (or become a new follower!), you can have a second entry in the drawing--just leave me a second comment telling me that you are a follower and how you follow. :)

I'll leave commenting open until 11:59 p.m. EST on Wednesday, June 25, 2014, and will draw one commenter at random. The winner will be announced right here on my blog on Thursday, June 26, and if I'm able to find an email address, I'll be sure to contact the winner as well.

Thanks for joining me today!
Emily

Wednesday, June 18, 2014

June DeNami Inspired By

Greetings, blog friends! Welcome to the June edition of DeNami Design's Inspired By feature! Each month we feature one talented DeNami customer's work, and then honor that wonderful artist with a host of DeNami DT projects inspired by it! This month we were inspired by Jennifer Loftfield.


You can read all about Jennifer's inspiring design right HERE.

Here's my creation that was inspired by her fun card:


I used DeNami's sweet Giraffe, Square Word Bubble, and "hi" from Everyday Greetings stamp set, as well as the Cloudy Sky embossing folder and some Pink/White Dots washi tape from the DeNami store.

Be sure to head over to the DeNami Design blog today to see how the rest of the team was inspired by Jennifer's lovely creation!

Thanks so much for visiting today. May your day be filled with bliss!
Emily

Wednesday, May 14, 2014

A Little Message for You . . .

Greetings, my friends! Today the DeNami Design Team is sharing designs over on the DeNami Design blog that show off the stamp in this week's Product Spotlight: Little Fawn. And boy, what a cutie this one is!


I pulled out an old Basic Grey 6x6 pad of patterned paper (PB&J collection) and picked out a bunch of fun patterns to use together. With all that pattern and color going on, I figured it would be best to leave my stamped images uncolored, so I stamped Little Fawn and the log from Woodland Logs Set on kraft cardstock and then fussy cut each for my design. Here's what I came up with:


My sentiment is DeNami's A Little Message for You stamp. I added a boutique button and some orange rhinestones, along with a chevron arrow trimmed from one of my selected sheets of patterned paper.

Be sure to check out the rest of the team's lovely creations today on the DeNami blog. Like what you see? Then you can score a great deal on this sweet woodland critter--as our Spotlight Product, it's on sale at 10% off for the next week!!

Thanks for stopping by today!
Emily

Monday, April 21, 2014

Hope you had a Happy Easter!

We had a wonderful Easter here at our house! It was a quiet one (just the four of us), but the weather was beautiful, Easter worship at our church was lovely, and we enjoyed some time together just hanging out. I wanted to share a few photos of our day.

We started with a light Easter breakfast before church. I thought we'd be crunched for time, so we decided to delay Easter baskets and egg hunt until after church. To help ease the "sting" of having to wait, I set a "fancy" breakfast table with pretty paper Easter napkins and my pretty apple blossom glass plates, with a fun strawberry-patterned cake stand elevating our triple berry muffins. That's a bowl of cut fresh pineapple in the foreground and a bowl of colored hard-boiled eggs at the far end of the table.


My daughter's extensive collection of handmade pompom chickies served as our festive centerpiece.


Here's a peek at my daughter's Easter basket, complete with handmade {by me} Easter cookie pops. I was tired of going the store-bought route for Easter treats!


The white bunny head pops are double-stuffed chocolate sandwich cookies {I'd say "Oreos" except they aren't; I went with the more economical store brand ;) } dipped in melted vanilla-flavored white candy melts. I cut pink jelly beans in half for the noses and used some leftover chocolate frosting to pipe tiny eyes. I made the ears from large marshmallows, snipped on an angle and dipped in pink decorating sugar. I made the ears in advance so I could press them into the bunny pops before the white coating set up. I'd seen several different versions of bunny Oreo pops on various blogs and combined the aspects of each that I liked best to create these. They were so much fun to make!


Can you tell that the darker cookie pops are supposed to be the hind ends of bunnies? (Or "Oh, look--bunny butts!" as my daughter put it!!) For these, I dipped Girl Scout Peanut Butter Sandwich cookies in milk chocolate candy melts. The bunny tails and feet are miniature marshmallows (for the feet I snipped a marshmallow in half and pinched the top to form a more longish jack-rabbit's foot shape). For the fluffy tails, I actually snipped off the tops of the marshmallows and dipped the sticky end in white sugar, but it is way too fine to actually see. I tinted a tiny bit of frosting pink and piped on pink paw pads. I came across the idea for decorating these on Pinterest, but the chocolate-dipped peanut butter sandwich cookie idea was all mine. And it's delicious!!!


That's it for my Easter photos. Thanks for indulging me! I hope you had a wonderful weekend.

Thanks for dropping by for a little slice of bliss with me today! I'll be back on Wednesday with a DeNami Product Spotlight. Can't wait to show you!
Emily

Friday, April 4, 2014

Photo Tutorial: Stamped Notepad

It's my turn to share another photo tutorial over on the DeNami Design blog today. This time around I'm showing how to make your own stamped notepad. I love giving these little goodies as gifts! Be sure to check out the DeNami blog for all the details.


If you need a little non-caloric homemade goodie to stuff an Easter basket for someone special, one of these little hand-stamped notepads would be a great choice! Wouldn't something like this look super cute with DeNami's Solid Egg Border for Easter? And the "Just A Note" sentiment from the All-Occasion Sentiments set would make a great alternate sentiment for a little pad like this, too.

Oh, and before I forget--I mention in my tutorial that to make a little notepad like this you'll need some PVA bookbinding glue. I bought mine HERE.

Thanks for stopping by today for this little peek at my photo tutorial. I hope you have a wonderful weekend!
Emily 

Thursday, April 3, 2014

DeNami Design ~ Easter Basket

Greetings, friends! It's my turn to share a project over on the DeNami Design blog today. I made a fun Easter card featuring the adorable Chickie Easter Basket stamp (thanks, Brenda!!!) and the new Basket Weave embossing folder from the DeNami Design store. I hope you'll swing by to take a peek and tell me what you think! Here's a little preview:


Thanks for dropping by! Have a super day!
Emily

Wednesday, April 2, 2014

Hoppy Easter

Did you survive April Fool's Day? There were murmurings of pranks being planned amongst the younger crowd at our house, but we managed to survive intact. The weather was glorious yesterday--sunny, calm, and 53 degrees F! It looks like today and tomorrow will be much of the same. It's about time!!!

I finished my work for the day early yesterday and took some time to clean up and organize my stamping area before playing with paper for a while. I'm working on replenishing my thank-you note supply, but I also took a little time to add to my stash of Easter cards. They are so much fun to make! Here's what I created:


All the papers are from a {very old} Crate Paper collection. I thought the colors were perfect for this Easter card, and I love the subtle patterns in each paper. This punch art bunny was so easy to put together using circle and oval punches! I just sponged on a little ink along the edges for depth, dug out a little pompom for a tail, and this Easter bunbun came together in no time. I used a pair of $1 bin alphabet stamp sets to spell out my own sentiment. I like that it looks uneven and "hand-stampy!'

I'm entering this card in my friend Pam's Just Punch It Free for All challenge.

I've got lots on the agenda for today, and this evening our son is performing in our school system's All-Town band concert, so I've got to keep things rolling!

Have a great day, and thanks so much for stopping by!
Emily

Wednesday, March 19, 2014

March DeNami Inspired By

Welcome back to the March edition of DeNami Design's Inspired By feature! Each month we feature one talented DeNami customer's work, and then honor that wonderful artist with a host of DeNami DT projects inspired by it! This month we were inspired by Kim S.


Isn't that the sweetest? You can read all about it right here on Kim's blog.

Kim used the delightful Woodland Friends stamp for her creation (and added in the new Balloon Trio stamp). I don't have that sweet scene {yet!}, but I do have most of the new individual Woodland Animals stamps, so I decided to recreate the scene with those. Here's how my card turned out:


I was inspired by Kim's lovely color palette and spare CAS design. Instead of replicate the design, I decided to do a riff on it: I incorporated the clean, uncolored aspect of Kim's background by keeping all of the stamped elements uncolored and incorporated her color scheme in the busy patterned paper that I used as the backdrop for my plain-brown-wrapper critters. I love how this "inverse" design approach really made those sweet critters pop!! Plus, this is a great way to use stamps that feature line art images quickly--no coloring required!

Here are the products that I used from the DeNami Design store:


Be sure to head over to the DeNami Design blog today to see how the rest of the team was inspired by Kim's sweet card!

Thanks so much for visiting today. May your day be filled with bliss!
Emily

Wednesday, March 12, 2014

St. Patrick's Day Critters

It's time for another DeNami Design Product Spotlight! Today the DeNami design team is featuring a super cute stamp set called Cuddly Pals.


Aren't these little guys adorable? I'm still on a St. Patrick's Day kick, so I put my little menagerie to work on yet another St. Patrick's Day card :). Here's how that turned out:


I also used these items from the DeNami store:


Be sure to check out the rest of the team's lovely creations today on the DeNami blog. Like what you see? Then you can score a great deal on the Cuddly Pals set--as our Spotlight Product, it's on sale at 10% off for the next week!!

Thanks for stopping by today!
Emily

Sunday, March 9, 2014

DeNami Design Fuzzy Friends Blog Hop

Welcome to the March DeNami Design Blog Hop! This month's hop is all about Fuzzy Friends!!


Hopefully, you've arrived here by way of Linda Monroe's blog, Stampin in the Suburbs. If so, you are on the right track! If not, you'll want to head over to the DeNami blog to start the blog hop at the beginning. (And remember, if you get lost along the way, you can always head over to the DeNami blog to get pointed in the right direction.)

Don't forget, there are some super-fun DeNami prizes to be won! Two lucky commenters will be drawn at random from among the comments left along the blog hop to win a $20 DeNami Design gift certificate! You have until Monday, March 10, 2014, 11:59 pm PST, to leave comments on all the blogs to be eligible for a prize. 


DeNami Design has SO many cute stamps that would qualify for the "Fuzzy Friends" description! Have you seen all the awesome new stamps in DeNami's new Woodland category? If not, you should definitely take a peek--so adorable!

I just had to use the new Little Hedgehog stamp for my creation for today's hop! Here's what I made:


I combined him with four other DeNami stamps--stump from Woodland Logs set, Balloon Trio stamp, party hat from Birthday Celebration 1 set,  and Happy Birthday Script stamp--along with the utterly fantastic Wood Grain embossing folder and orange baker's twine from the DeNami store.

It's time for me to send you along on your way. But before you leave for more DeNami fuzzy friends inspiration, be sure to leave a comment to be eligible for the randomly drawn prizes.  Then you can head out to see the next blog hop participant on today's list: Tenia Nelson
 
Thanks so much for stopping by today! Enjoy the blog hop,
Emily

Tuesday, March 4, 2014

Happy Fat Tuesday!

It's hard to believe that Ash Wednesday is just about here--even though it is soooooooo late this year. It always seems to sneak up on me! Anyway, that means that today is Fat Tuesday, or Mardi Gras. My HS freshman daughter's French 2 class is celebrating Mardi Gras today at school. She took on the "culinary expert" role for her group's project (another group member is researching the history of French Mardi Gras traditions, and someone else is reporting on some other aspect which completely escapes me at the moment!). Her assignment: research and bake a King Cake to share with the class. She and I worked together last night to bake the cake and had such a blast doing it! The Gulf Coast-style King Cake that we made is a cinnamon-filled coffee ring, and while it baked, the house smelled heavenly!! She was so pleased with how it turned out. We cut it into small wedges for sampling (as well as to make it easier for her to carry it to school). After we'd cut 36 wedges for sharing and completely filled the plastic container for transporting them, we still had about 1/4 of the cake left. Guess what we're having for dessert after supper tonight!!!!

We were so thrilled, we just had to take pictures (even though the post-sunset lighting conditions in the kitchen were less than ideal). Here's what it looked like:


Yum!! The recipe my daughter found (you can find it HERE) was really simple--it's based on Pillsbury Crescent Rolls!! I think we'll be adding this recipe to the "keepers" file ;).

And while I'm sharing non-crafting photos, I thought I'd share a photo of some visitors we had last week. Last week I noticed that a lot of deer have been hanging out in our neighborhood. One morning I saw about 20 deer amble down our road just before sunrise. Just before bedtime that evening, we spotted five or six deer bedding down in our neighbors' yard. I was stunned the next morning to see them still there, right out in the open! I grabbed my camera for this shot, taken right through the sidelight windows of our front door, not quite 30 feet away. The sun was just starting to come up, and they were just getting ready to move on.


Well, I have tons to do today, so I've got to be moving along. I hope that my daughter's Mardi Gras celebration goes well today--and I hope that you have a fabulous day yourself!

Thanks for visiting!
Emily

Thursday, February 27, 2014

My Embossed Elements winner!

Top o' the mornin' to you! I'm so happy to announce the winner of my St. Patrick embossing folder giveaway from Monday, so we'll get to that straightaway--then I'll give a little eye candy as a consolation prize ;) .

Here we go: Random.org chose #22 as our lucky number, and that commenter was Amy C.! Congratulations, Amy! I'll be emailing you shortly to get your information.

And now, a little extra embossing inspiration with that fabulous St. Patrick embossing folder that Amy C. has won. I was so impressed recently with a beautiful card that the lovely Greta Hess made that used some partial embossing. I just had to try it out! And this is what I ended up with:


I love how it looks just like someone has just tossed out a hand full of shamrocks that scattered part way across the card. Thanks for the inspiration, Greta!

And isn't that scene full of leprechaun chickies adorable? It was a blast to color with my Copic markers :). Here's a full list of the DeNami Design products that I used to create this card:


Well, thanks for joining me on yet another chilly morning (such that it is here in New England). Fingers crossed that spring arrives soon! We need to melt some of this frozen-solid snow of ours!!

Have a day filled with bliss!
Emily

Wednesday, February 26, 2014

DeNami Design Product Spotlight February Blog Hop

DON"T FORGET!!
My giveaway for a 
 ends tonight. 
Be sure to check out the details HERE to enter!!
****

It's the last Wednesday of the month and that means it is time to show off another awesome DeNami Design stamp with a blog hop! This month we are featuring the off-the-charts adorable Irish Chickies stamp!


These little guys are so fun to color! And this trio is just perfect for sending a little luck o' the Irish to someone special  :) . Here's how I put them to use:


In addition to the sweet Irish Chickies stamp, I used these fabulous products from the DeNami Design store:


You can purchase this adorable stamp for 10% off the regular price for the next week. You also have the chance to WIN this fabulous product in today's spotlight blog hop! All you need to do is hop along to each stop in the lineup, leaving comments along the way. Here is the blog hop lineup:

DeNami blog 
Lisa Petrella
Deb Wabbe
Wendy Elliot
Emily Keaton  <==== you are here!
Lisa Elton
Pattie Goldman
Dana Seymour
Tammy Hobbs

One commenter will be selected at random to win this month's prize! Just check out the DeNami blog for all the details.

Thanks for stopping by today--have a super day!
Emily

Friday, February 14, 2014

Happy Valentine's Day!


Hello and Happy Valentine's Day! I'd really hoped to write up this post yesterday (at the latest) and schedule it to go live much earlier today, but between having a husband home sick for two days this week and another Nor'easter winter storm that cancelled school yesterday, I didn't have much alone time to finish my top-secret Valentine's Day projects or get them photographed for a blog post. So, finally, everything is pretty much back to normal at my house, and I spent the morning putting the finishing touches on some Valentines and gifts for my family. It will be fun to surprise everyone at suppertime tonight!

I know that some folks pan Valentine's Day as an overly romantic, Hallmark-fueled holiday, but I really and truly love it! It gives me an event-kind-of-something to look forward to in the otherwise dreary, cold, and frozen month of February. The pretty colors (reds! pinks! lavenders!) are such bright spots in the colorless winter landscape, and the fun shapes/motifs (hearts! cupids! doilies! arrows!) and loving sentiments are true pick-me-ups. And how can you go wrong with a holiday that is rooted largely in chocolate? I say bring it on!!

I love giving Valentines! I give them to my husband and kids, but also send them to my parents, sister's family, in-laws, aunts and uncles, and friends all over the country. For me, Valentines are just such a fun way of sending a little love and letting the folks I care about know that I've been thinking of them. I spent a large chunk of my day on Monday getting my Valentines ready to mail: signing, stuffing and sealing envelopes, addressing, weighing and attaching proper postage, and then heading off to the post office to get them in the mail system before the end of the day. My fingers are crossed that everything will be delivered in time! Yes, it is a labor of love, but it makes me feel good, and I hope that a little something that I took the time to make and send will brighten the day of those I care about.

Over the years I've collected a number of small empty heart-shaped candy boxes, and I decided that instead of buying treats to give for Valentine's Day, I'd upcycle a few of my heart-shaped boxes and fill them with some homemade chocolate candies. Here are the boxes I decorated:

For my dad:

From DeNami Design: Dad stamp, Elegant Oval Frame stamp, heart from Whimsical Valentine stamp set, Chevron embossing folder, and Black Chevron washi tape

What's inside? Some hand-dipped Dark Chocolate Vanilla Creams!

I based these on this recipe from Land O Lakes.

For my mom:

From DeNami Design: Small Valentines Script stamp, Solid Rose Accents stamp set, and Red Heart Lace washi tape.

Wanna peek at what she'll be biting into? Milk Chocolate Peanut Butter Balls!

I based these on this recipe from Parents Magazine (February 2011).

I have a punch art penguin-themed box for my hubby:
 
From DeNami Design: Square Word Bubble stamp, Love Sentiments stamp set, and heart from Whimsical Valentine stamp set.

a punch art owl-themed box for my 15YO daughter (to go with this card for her):

From DeNami Design: Square Word Bubble stamp

and a Despicable Me minion-themed box for my 11YO son:

The patterned paper is from Target's One Spot, and I printed the sentiment with my computer.

to go with the minion Valentine I made for him (I was inspired by this minion Valentine):

From DeNami Design: Small Valentines Script stamp, Love Sentiments stamp set, Small Heart Outline stamp, Small Scallop Heart stamp, chevron border from Modern Borders Set, and two white Boutique Buttons.


I can't wait to see everyone's reactions!!

Thanks for bearing with me through this long and photo-heavy post :D! I hope that you have a lovely day today.

Happy Valentine's Day!
Emily

Saturday, February 8, 2014

Owl Be Your Valentine

Hello there! Today I have a little owl-themed Valentine to share:


Time is running out on my friend Pam's Just Punch It Challenge. Valentine punch art is this edition's theme. I'm still working on my Valentines and had a bit of time to play with paper today, so I dove right in. The patterned paper is from Target's One Spot. The Teeny Heart Background stamp and Rectangle Word Bubble stamp are both from DeNami Design. The branch stamp is from Schlosser Designs.

I created that cute little owl by starting with a rectangle of red cardstock and then punching part of an oval to create his tufted head and using corner rounder to shape his base. I used various sizes of heart punches to make his tummy, beak, and feet. His eyes are, of course, layered circle punches, and his wings are two halves of a small scalloped circle punch. He was so easy to make!

I simply used my computer to print the sentiment on cardstock and then used my Stamp-a-ma-jig to stamp the word bubble around it.

Thanks for stopping by!
Emily

Monday, January 20, 2014

Polar Bear Love

I spent soooooooo much time in my crafting space over the weekend--it was awesome! I have a lot of cards to add to my collection of Valentines to send out to family and friends in a few weeks, which has given me a real sense of accomplishment. Yay!

Anyway, the card I have to share this morning is for my friend Pam's very awesome Just Punch It challenge. Her latest challenge is to create a punch art project with a SNOW theme. What a fun one!

The obvious choice for a snowy punch art challenge would be a snowman, but I already entered a snowman card like that in one of Pam's Just Punch It challenges back in December. Sure, I could have come up with a different snowman design and that would have been just fine, but I've really been having fun learning about and playing around with punch art, thanks to Pam's challenge. So I figured that this would be a great opportunity to push myself to try something new, and I ended up cruising the internet for inspiration. I was ultimately inspired by this creation made by Cindy Lawrence to make this polar bear card, which I think will be so much fun to give for Valentine's Day!


I used the beautiful Love Flourish stamp for my sentiment and a Snowflake Swirl embossing folder  for my background. Both are from the DeNami Design store. The polar bear faces were constructed with round punches (1 3/4" for mama and 1 1/8" for baby + 3/4" and 1/2" for the ears) and ovals cut in half for the snouts. Easy and super cute! Both of my kids sent up choruses of "Awwwwww!" when I showed them what I'd made :). I'd have to say that I'm inclined to agree!

Both of my kids are home from school today for the Martin Luther King Jr. holiday, but hubby had to head in to work this morning (boo hoo). My daughter (HS freshman) has a week of mid-year exams to take starting tomorrow, so it's been a busy weekend of studying for her. But we are going to leave (hopefully in just a few minutes!) for a few errands and a bit of fun before lunch: we're heading to the arcade to use up the 100+ tokens we've had sitting around the house for over a year and a half now. It's time to clear those babies out! Then it will be back to the ol' grindstone (well, at least for some of us).

So, that's it for now. I hope you'll take a minute to check out Pam's Just Punch It challenge--it's really a lot of fun! She has some great prizes to offer! It's a relatively young challenge, so she doesn't have many players yet and I know she would welcome more folks to join in the fun :). I know, for one, that I'm having a blast!

Just Punch It challenge

Thanks for sharing my little slice of bliss for today!
Emily


Thursday, January 16, 2014

Secret to a Long Life

My brother-in-law's birthday is coming up fast, and I realized today that I didn't really have anything in my birthday card stash that would be suitable for him. I figure that humorous cards are always in style for guys, so I decided to take that route with the BIL's card. Here's how that went:


The inside of the card holds the punch line:


I'm playing along with the Paper Smooches SPARKS Picture Perfect Challenge, which is to be inspired by this photo:


There was so much to be inspired by! The colors, the blocking, the textures, the vertical elements, even the "text block" on top of the cake!

Of course, I used stamps from Paper Smooches for my card! The owl comes from the My Peeps set, and the party hat elements come from the Party Posse set. I printed the speech bubble and sentiments using MS Word on my computer. The font is called CK Buddies. I had fun adding texture to my design with two different "masculine-ish" embossing folders from DeNami Design: Thin Lines and Checkered.


I'm also playing along with the new challenge over at Simon Says Stamp Wednesday Challenge. This week the challenge is to "Emboss It." Done and done!

Thanks for the great challenges, SPARKS and Simon Says!!


And thanks for dropping by, my friends!
Emily

Wednesday, January 8, 2014

DeNami Design Happy Monsters Sneak Peeks

Welcome to Day 3 of the DeNami Design Spring/Summer 2014 Release Sneak Peeks!! Today DeNami DT Member Tammy Hobbs and I are giving you sneak peeks of brand-new DeNami stamps about to be released on January 10!! Today's sneak peeks are in a brand-new category of DeNami stamps: it's the HAPPY MONSTERS! Be sure to read all the way to the end of this post for details on a great giveaway :D.


These little monsters definitely aren't the spooky kind {wink}. Let's see what kinds of projects you can make with them:

1) My first project is a Father's Day card! I used two cute little happy monsters from two new stamps, E173 Happy Monster w/Balloons and N146 Happy Monster Party. I stamped and fussy cut a large monster from the Happy Monster Party (leaving off his party hat). I also fussy cut the smaller monster, leaving off his party hat and balloon so the daddy monster and kid monster could hold hands! I also used the DeNami Happy Father's Day sentiment, Tuxedo Black Memento ink, Teal Chevron Washi Tape, and one of the new Chevron Embossing folders carried in the DeNami store.


2) My second project is a perfect card for saying hello to a far-off friend! It features the new I69 Happy Monsters in Car stamp, as well as the new E175 Balloon Trio. My card design was perfect for pairing up with the Sending You Smiles sentiment. And doesn't the Cloudy Sky embossing folder make a great background for my road-trip scene?


3) And finally, for my third project, I turned the new N146 Happy Monster Party stamp into a Valentine's Day card! I also used the brand-new F240 You Make Me Feel sentiment and some hearts from the Whimsical Valentine stamp set. Isn't it perfect? And so is the Layered Hearts embossing folder that I used as my on-theme background.


Are you still with me? I mentioned a giveaway way back at the beginning of this post. DeNami is giving away multiple gift certificates today, so be sure to leave a comment here on my post and then check out the DeNami blog for all of the different ways you can win today. :)


I'm so glad that you dropped in to check out some of the new Happy Monster stamps in the DeNami Design Spring/Summer Release! Be sure to tune into the DeNami blog tomorrow for giveaway winners and release full reveal.

Until then, have a day filled with bliss,
Emily 


Sunday, December 1, 2013

Christmas Stamped Gifts

Happy December 1st, my friends! It's time to start those Advent calendars--what a happy time!

Today I'm bringing you a few more holiday gift projects as part of the Purple Onion Designs Holiday Design Team. Today the team is focusing on stamped gifts. I think I've mentioned before that I'm trying to make as many of the gifts my family will give this year as possible. First I have another item that will make a perfect teacher gift--what elementary school teacher ever has enough thank you notes?

I started by making a set of six one-layer thank-you notes, two each of three different designs using the super sweet Laurel, Filbert, and Elm characters from Stacey Yacula's holiday rubber stamp collection and a whimsical Thanks sentiment (#PF01), all from Purple Onion Designs, of course. Stamped on linen-textured cardstock and colored with Copic markers, these simple notes will be easy for a teacher to use and mail (with lumps, bumps, or extra postage!).


Next up--some packaging to make this gift extra special! I slid the notes and six envelopes into a cellophane treat bag and stapled on a hand-stamped bag topper created with a variety of Purple Onion Designs rubber stamps: an oval frame from the Vintage Journaling Set, the smaller flake from the Snowflake Set, a fantastic sentiment from the Handwritten Holiday Set, a pair of To/From sentiments for the back of the topper, and, of course, another sweet Filbert the Penguin!


Here's a little peek at the back of the package. You can see the tone-on-tone snowflake stamping a little better here, and there's the To/From sentiments that make this packaging gift-ready!


My fifth-grader is already excited to give this gift to one of his teachers!

For my second project, I'm sharing a snowflake Christmas ornament. I started by stamping the six-pointed snowflake from Purple Onion Designs' Vintage Snowflake Set and heat-embossing it in silver. After trimming it out, I mounted it on a snowflake diecut and blinged it up with silver Stickles and rhinestones.


I wanted to make my snowflake commemorative, so I stamped the date (using a retired mini alphabet/number set from POD) and a "Merry Christmas" sentiment from the Handwritten Holiday set on the back of the ornament.


Be sure to swing by the Purple Onion Designs blog today for lots more ideas for stamped holiday gifts from the POD Holiday Design Team!

Enabler alert!! Purple Onion Designs is running a Holiday Sale right now, with 25% off ALL STAMPS in the store! The sale runs through Tuesday, December 10, 2013. So be sure to check it out!


Thanks for stopping by today!
Emily