The little things that make me happy here on Bliss Road~~Emily Keaton

Thursday, March 31, 2011

StampinB Stamped Background Challenge

Happy Last Day of March!! Is March going out like a lamb where you live? We are expecting an April Fool's Day Nor'easter which could bring 6 to 12 inches of snow to our region. Not exactly lamb-like and certainly not how I was planning to welcome April!

Anywho, it's Thursday and time for a new challenge from the Stampin' B's DT. This week Vicky Gould is our hostess and she is challenging everyone to make her own background using only stamps--no designer paper allowed. I've only been able to make one Easter card so far this year, and having no Easter-themed DP, this challenge to make my own was the perfect opportunity to grow my Easter card stash.
I stamped my backgrounds using a pretty Easter egg stamp I found in a dollar bin at Michael's last year. I recently found a package of Recollections gold cross stickers on clearance (also at Michael's) and was thrilled to use my first one on this card. I made the large ribbon rose from scratch but the two smaller ribbon flowers come from Offray.

Challenges:
And there you have it!! I hope you've been inspired to play along with the Stampin' B's!! If you do make a card, post it on your blog or SCS gallery, and link it up to the Inlinkz tool on the Stampin' B's blog. We'd love to see what you create!! :)

Thanks so much for stopping by to check out my little slice of bliss for today!

Card Recipe:
Stamps: Easter egg image from Michael's dollar bin
Paper: SU pink pirouette CS, SU certainly celery CS, storm white CS, PTI kraft CS

Ink: Palette burnt umber, Palette toile pink, SU certainly celery, Ranger tea dye distress ink
Accessories: EK 2.25" circle punch, SU 2.5" circle punch, CM circle cutting system, CM corner rounder punch, EK rock fern punch, Stamp-A-Majig, sponge dauber, sewing machine, dotted grosgrain ribbon, narrow satin ribbon, pearls, Offray ribbon flowers, Recollections cross sticker
Techniques: machine stitching, ink distressing

Wednesday, March 30, 2011

Paper Bouquet

Whew! It's been a busy week so far, with no end in sight. I realized rather late in the day yesterday that I had yet to make my StampinB DT sample card for this week's new challenge on Thursday. Oops! Tried to kick-start my mojo, but it wouldn't even turn over, so I had to go forward with a card that is rather, well, . . . blah. If you choose to spend any of your precious time taking it in, you'll see it tomorrow. But don't say I didn't warn you that it is underwhelming!

On Monday, my neighbor M (with whom I share elementary school a.m. carpooling/kidwalking duties) called to let me know that another of our neighbors K, a mom of two elementary school kids, had been hospitalized on Sunday. Apparently K had been working at her computer at home and the left side of her body suddenly started going numb. Her husband took her to a local urgent care center and from there she was transported by ambulance to one of the big teaching hospitals in Boston. After an endless battery of tests, doctors still don't know what has caused her symptoms. It looks like she will be kept in the hospital until the cause has been pinpointed. Very scary for her and her family. M has organized meals for the family this week (I'm taking homemade chicken and wild rice soup with a loaf of homemade bread over after school today), but I wanted to do a little something for the patient, too. So yesterday I put together a small care package to send along to K: a get well card, a book of word searches (to help fill the time), a pretty note pad and matching pen (to help keep her organized), and a little bouquet of paper flowers (to help cheer her room).
I feel bad that what I was able to scrape together wasn't much. Certainly real flowers would have been much better (but on the upside, these are easy to transport and won't require water). But I hope that it will let K know that we are thinking of her and pulling for her recovery.

I saw a tutorial for these flowers on the October Afternoon blog yesterday. I thought they were adorable and immediately knew that they would be perfect for K's care package. I wish that I'd had more time to practice them a bit first, because these first attempts were not nearly as nice as the OA samples. Now I know that I it's OK to leave gaps between the flower petals. I tried to make mine all line up so they were touching, but that left an awkward open gap that I filled as an afterthought, making them look a little dopey. Live and learn, right? Next time I'll have it all down pat. :) In the meantime, I'm entering these in this week's Florals Challenge at Tuesday Throwdown.

In other news, my dear SCS/blogging friend Brenda (aka Benzi) is sponsoring some fantastic blog candy this month over on her blog Benzi Stampz. Just take a look at the loot she has up for grabs. For details on how to enter, please see this post on her blog. Good luck!

Well, that does it for this Wednesday. I'm off to deliver kids to school and then start my chicken/wild rice soup. Have a good one!

Emily

Project Recipe:
Stamps: TAC
Paper: Crate Paper DP
Ink: Palette noir black
Accessories: EK 1.25" and 1.5" circle punches, SU large tag punch, buttons from my stash, sewing machine, Caribbean baker's twine from The Twinery, pipe cleaners

Saturday, March 26, 2011

Sparkly Springtime

Happy sunny Saturday to you! It's cold here today, but at least it isn't gloomy. We had a fun family night last night (homemade pizza and a movie with the kids here at home. We finally saw Diary of a Wimpy Kid. Funny!) and we are enjoying a leisurely Saturday for once.

Last month I won a $20 gift certificate to DeNami Design Rubber Stamps. They have a plethora of precious products, so it took me a while to decide what to get. But I finally placed my order earlier this week, and my new DeNami stamps arrived a few days ago. I couldn't wait to try them out, and today was my day to play. So this is my very first DeNami card!
I fell in love with this adorable Rosebud Trio as soon as I laid eyes on it! Unfortunately, my rhinestone centers kind of obscure the sweetly swirled centers. But that gives me an excuse to try again with this stamp sometime soon. :)

This card is playing along with these challenges:
Before I go, I want to share a photo of a little project my 12YO daughter has been having fun with. She had a friend over after school yesterday and they spent a blissful afternoon at our kitchen island crafting a flock of these fluffy little Easter chicks. It looked like a chicken coop here afterward--you should have seen the little feather bits swirling around everywhere--but I'd have to say the mess was oh-so-worth-it. These little guys make me smile!!

Thanks for stopping by to check out my little slice of bliss today! Have a super weekend.
Emily

Card Recipe:
Stamps: DeNami Designs Rosebud Trio, SU Tiny Tags, The Angel Company (sentiment)
Paper: MFP white storm CS, SU old olive CS, SU pumpkin pie CS, K&Co Marmelade DP

Ink:
SU old olive, SU pumpkin pie
Accessories:
MS french scroll corner and border PATP punches, SU jewelry tag punch, yellow embroidery floss, needle, colored pencils, foam tape, brad, rhinestones, rhinestone butterfly sticker
Techniques: hand stitching

Friday, March 25, 2011

Papertrey March Blog Hop Challenge


(This is my third post for today. I know, I'm on a roll. Please scroll down for more.)

Today is Papertrey Ink's monthly customer blog hop today! This month the challenge is to use embroidery floss.

Essay
Why I Love Embroidery Floss
I love embroidery floss. I have tons and tons of it in my stash and use it all the time, much as I would use twine. It's great for tying into flat-ish bows, super for stitching on buttons, and awesome for tying on tags and charms. I also make flower stems and string up banners with it. Plus, it's so cheap and comes in so many colors. And that is why I *love* embroidery floss.
The End

Here's my take on the challenge (which you can read all about here.) Let's move on to meeting my challenge card, shall we? The balloon strings and "here to give you a lift" sentiment come from PTI Everyday Button Bits. I used embroidery floss (in green, yellow, and orange) to stitch the button "balloons" to my card and added an orange embroidery floss bow to tie the balloon strings together.

I wanted this encouragement card to be bright and cheery. T
his week's Tuesday Trigger challenge in the Moxie Fab World inspired me to use those yummy citrus colors. I'm also playing along with these challenges: Thanks for taking the time to stop by my blog to check out my little slice of bliss for today! I appreciate your visit. :)

Have a super weekend!
Emily

Card Recipe:
Stamps: Papertrey Ink Everyday Button Bits
Paper: MFP white storm CS, various CS from The Paper Company

Ink: Marvy LePlume II black marker,
Versamark
Accessories: white EP, heat tool,
MS loops corner and border PATP punches, assorted embroidery floss, needle, Doodlebug buttons (tropical assortment)
Techniques: hand stitching, embossing

You Take the Cake


(This is my second post for today. Please scroll down for more.)

After several days filled with errands, work, and those must-be-attended-to life tasks, I finally have some time for creating. Yay!

All week I've been wanting to play along with the new EtsyInspired challenge, which is to be inspired by the wares of the Etsy shop Dollbirdies. I just love the fantastic variety of fabrics used in the purses, wallets, and passport covers found here. I was particularly taken with this adorable passport cover. I found a decent match for it with some papers from my BasicGrey Green at Heart pad.

The sentiment is a computer-printable "Simple Sentiments" from Paper Crafts magazine. You can find it, along with nine more from the March/April 2011 issue, HERE. The "You take the Cake" sentiment I used is actually a bright, pretty fuchsia color in the file, but there must be something wrong with my new ink cartridge, because when I printed it out (unaltered by me!), it came out much darker. Which turned out to be just fine--looks kinda razzleberry to me and suits my color palette for this card just perfectly! I'm entering this card in the Paper Crafts Simple Sentiments Gallery Challenge.

I'm also playing in these two challenges:
  • All Things Unity #27: Bling, which I used to turn the sentiment into a thought bubble. (My Unity stamps are from the Total Cuteness kit.)
  • 4 Crafty Chicks: eyelets. I used some green eyelets from my stash to anchor the corners of my DP panel.
  • Crafty Creations: in stitches
And that wraps up my first card {of probably several} today. Just wanted to leave you with this thought, something I spied on a bumper sticker earlier this week:

Nothing is foolproof
to a sufficiently talented fool.

Now, isn't that the truth??? I had a good chuckle in the car after spotting that one.

I'll probably be back later. See you!
Emily

Card Recipe:
Stamps: Unity Total Cuteness
Paper: SU rich razzleberry CS, white CS from The Paper Company, SU pumpkin pie CS, BasicGrey Green at Heart DP

Ink: Palette bourdeaux
Accessories: EK circle and scalloped circle punches, foam tape, scissors, computer printer, sewing machine, googly eyes, Crop-A-Dile, eyelets, Peapod baker's twine from The Twinery, rhinestones
Techniques: machine stitching, paper piecing

We have a WINNER!!

Thanks so much to everyone who helped me celebrate my 200th blog post by leaving a comment on my Blog Candy post!! I just used random.org to draw a winner, and that lucky duck is:


Erin, you have until noon EDT on Monday, March 28, 2011, to email me with your full name and mailing address to claim your prize. (Click on "View my Complete Profile" under ABOUT ME in the right-hand sidebar. You'll find a link to my email address there.)

If I don't hear from Erin by the deadline, I will draw a new winner on Monday afternoon. So stay tuned!

I'll be back later today with some cards to share. Have a great day, everyone!!


Thursday, March 24, 2011

StampinB Masculine Birthday Challenge

***Today is the last day to enter the drawing for
my Blog Candy in celebration
of my 200th blog post!
You can check it out HERE.
The drawing is
open until 11:59 p.m. EDT tonight.***

It's time for a new challenge from the Stampin' B's DT! This week the challenge is to make a masculine birthday card. What a good challenge--that's one area of my stash that always seems to be lacking.

I was intrigued by the Cityscapes Are On the Rise Challenge in the Moxie Fab World when it was issued two weeks ago. I had to think and think of how to approach it, having nothing in my stash that was remotely city-related. I finally heat embossed some white dot patterns on dark card stock and clipped the buildings of my city skyline from that.

I'm playing along with a few more challenges, too.
  • My color scheme comes from this week's ColourQ Challenge:
  • Papertrey Ink's Make It Monday Challenge #7: Adding Color to Non-Neutral Card Stock with markers or colored pencils. I chose this adorable airplane and banner combo from PTI's Fly Away set. I added some subtle shading with my Prismacolor pencils.
  • Paper Sundaes: Embossing. The Happy Birthday sentiment and dots on the buildings were all heat-embossed in white.
I feel pretty good about this card. I wasn't sure that my makeshift "buildings" would come together to make a convincing skyline, but I don't think I should have worried. This will be perfect for my nephew's birthday when he turns 11 next month.

I hope you've been inspired to play along with the Stampin' B's!! If you do make a card, post it on your blog or SCS gallery, and link it up to the Inlinkz tool on the Stampin' B's blog. We'd love to see what you create!! :)

Thanks so much for stopping by to check out my little slice of bliss for today!

Card Recipe:
Stamps: Papertrey Ink Fly Away; {ippity} Love in Return (dot patterns)
Paper: SU bashful blue CS, SU kiwi kiss CS, SU bermuda bay textured CS, dark purple CS from The Paper Company, MFP white storm CS

Ink: Palette noir black, Versamark
Accessories: white EP, heat tool, Prismacolor pencils, scissors, foam tape, Caribbean baker's twine from The Twinery
Techniques: embossing

Tuesday, March 22, 2011

My First Window Card

***Have you checked out my Blog Candy in celebration
of my 200th blog post this week?

If not, you can find it HERE. The drawing is
open until Thursday, March 24, 2011.***


I have been having a blast playing along with Amy Tsuruta's Flashback Friday Challenges. I love the idea of looking back to find my "first" of something (like last month's challenge to post your 3D project) and re-posting it in the present day. It's a wonderful affirmation of how far I've come as a papercrafter and a chance to reminisce about past projects (even if my "first" of something means reminiscing about a project I made only 8 months ago lol!!).

Flashback Friday 9.0 challenges us to re-post our very first window card. I didn't have to go back very far to find the first time I tackled one of these--just last June. An SCS friend had recently sent me a fun barn window stamp and I was itching to make a card for my horse-loving daughter. Here's what I came up with:

I was so very proud of it at the time, but cringed a bit when I looked at it with fresh eyes just now. Does that window look a little crooked to you? And how about those cheap dollar-store raffle tickets I used. Doncha think I should have trimmed those down a bit? I mean, they are totally printed off center. Yikes! But you know what? Even with all of these cringe-worthy details, my daughter loved it and still has it hanging on the bulletin board in her bedroom. :)

Thanks for taking a peek at a little piece o' my cardmaking history today!!
Emily

Sunday, March 20, 2011

H{IPPITY} HOP + Blog Candy

I am so thrilled to be participating in my first H{ippity} Hop blog hop for {ippity} stamps! I've been using {ippity} stamps for just about a year now and absolutely adore them. I figured it was high time that I joined in a H{ippity} Hop! Please visit the {ippity} blog for a full list of the blog hop participants so you can see all of their inspiring {ippity} creations. (And keep reading for a chance at a little blog candy, 'K?)

With today's card, I'm playing along in the March 2011 {ippity} Monthly Challenge {with a twist}--specifically the inspiration photo of this lovely pillow:
Here's the 5" x 7" card that I came up with:
After staring at that fab pillow for a while, all I could see was a flock of layered paper lollipop flowers! So I set out to recreate it. I used the leaf image from Now & Always and the birthday sentiment from Just Wanted to Say. For the flowers, I used my circle punches to punch four circles in different sizes for each flower. I spritzed them lightly with water, pinched and crumpled them, and then allowed them to dry. Finally, all I had to do was stack them up to create a flower and attach it to my card with a rhinestone-studded brad. Easy!

I also incorporated these challenges into my card:
And now for some exciting news: this post is my 200th blog post!! I was stunned to realize that I've made that many posts, especially since I only started blogging last July. To celebrate this milestone, I am offering some blog candy:

one brand-new
Margarita Moments stamp set
from Unity Stamp Co.

(isn't it adorable?)

Yes, I know you must be thinking "How fabulous! What can I do to win this awesome stamp set?" Well, it's really quite simple. To enter my random drawing for Margarita Moments:
  • You should be a follower of my blog or become one.
  • You should be a U.S. or Canadian resident. (Sorry, I'm not able to ship internationally.)
  • Leave me a comment on this post telling me your current favorite color of card stock! (One comment per person please). Be sure to mention your favorite card stock color in your comment or you will be ineligible for the prize.
Entries for the blog candy drawing close at 11:59 p.m. EDT on Thursday, March 24, 2011. I will announce the winner here on my blog on Friday, March 25, by noon EDT. The winner will have until noon EDT on Monday, March 28, to contact me via email to claim her prize, or a new winner will be drawn.

So, how does that sound? Thanks so much for stopping by my blog today, checking out my little slice of bliss, and helping me celebrate my milestone 200th blog post! I hope you'll come back to visit again soon!!

Cheers!
Emily

Card Recipe:
Stamps: {ippity} Now & Always and Just Wanted to Say
Paper: Kraft CS from Paper Maniac, various card stock scraps for flowers and leaves

Ink: Palette bourdeaux, Palette jardin moss
Accessories: various sizes of circle punches, scissors, various brads, Queen & Co. rhinestones in various colors, sewing machine
Techniques: machine stitching, handmade flowers

Button, Button

Happy Spring!! Finally, the first day of spring is here. I am soooooooooooooooooooo ready for it. We actually hit 70F on Friday and were enjoying some fabulous spring weather, but it has cooled off since then. But that's OK. I know there's more where that came from!

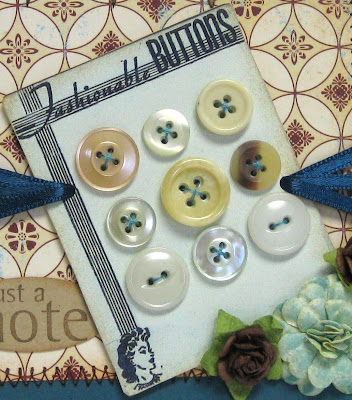
This week's Tuesday Trigger in the Moxie Fab World features vintage buttons cards. Lots of stamp companies (including Stampin' Up! and Papertrey Ink) have been bringing very cool vintage button card stamp sets to market recently. They are oh, so tempting but not in my budget. When I inherited my gramma's sewing basket over a decade ago, her collection of buttons came with it. Not only was there a treasure trove of vintage buttons, there was a nice selection of button cards as well. I do love my buttons, so I was thrilled to receive these! And they immediately jumped to mind when I saw the Tuesday Trigger photo inspiration:
I fished around in my button collection to see if I could find an actual vintage button card to use in my TT project. I found several that were promising. Not wanting to immediately use up this precious vintage resource, I decided to try scanning one (then printing it out on Neenah natural white card stock and cutting it out) and had fabulous results. Here's the card I came up with:
I sewed on an assortment of "fashionable" vintage buttons in neutral colors from my stash and mimicked the ribbon treatment seen in the inspiration photo. (BTW, you know those sometimes annoying ribbon loops sewn into the shoulder seams of tops and blouses? A new shirt of mine had those--and the first time I wore it, the loops kept sliding out of the armholes for all the world to see. Annoying! While folding laundry yesterday, I decided to make them annoying no more and clipped them out. Fixed! And as I did so, I realized that the ribbons were the perfect color for the scheme I had planned for this card. And that's where my ribbons came from! I love repurposing.)

Do you like the look of vintage button cards but have no source of your own? I'm happy to share the one I used on this card. First, click on the image below (to see it full size) and then right click on that image to save a copy to your computer's hard drive. Feel free to resize as needed and print out for your own projects!

I wrapped a few other challenges into this card, including
OK, now that you've made it through the description of one of my projects for this weekend (another post will be coming your way soon with the other one I tackled), here's a little family update. Today our second-grade son celebrated his First Communion at church. He was so excited and did a wonderful job. We're so proud of him! And our sixth-grade daughter wrapped up a big project for science. They have been studying a unit called "Building Big," all about the science and engineering of constructing buildings. Their project was to use the building principles they'd learned to design their own building and then make a model of the building framework. With guidance from dad (which was allowed as long as it was in the form of teaching and side-by-side working), she built this awesome model. My dear hubby did a fantastic job of teaching her how a real house is built--that the walls are built in sections on the floor/ground and then stood up in place as you go. He helped her figure out what size to make the wall sections, etc., and then she built all the walls. He taught her how windows are braced, how loads are carried, about floor joists, roof rafters, laminated beams, and more, plus how all of these things could be translated into the miniature. And then she went to town and built the pieces she needed. Today, the two of them worked together to assemble all the parts into this beautiful DD-designed house. It's been a wonderful experience for both of them; a valuable learn-by-doing experience for our daughter and memorable teaching opportunity for my husband, one that neither of them will soon forget. :)

All right, let's wrap up this long post now. Thanks for stopping by to check out my little slice of bliss for today! Have a great week this week--and I hope to see you back again soon. :)

PS Oh, one last thing!! (Sorry!!) I just realized that this is my 199th blog post. I can't believe it! Anyway, I've decided that with my next blog post (yup, that will be #200!), I'll be offering some blog candy to celebrate this milestone. Be sure to come back to check it out!!

Card Recipe:
Stamps: Unity Little Me and {ippity} Just Wanted to Say
Paper: SU not quite navy CS, MFP kraft CS, Neenah natural white CS, The Girls' Paperie On Holiday DP

Ink: Palette burnt umber, Ranger tea dye distress ink
Accessories: SU small oval punch, foam tape,sponge dauber,salvaged satin ribbon, needle and thread, vintage buttons from my stash, sewing machine, mulberry paper flowers, hemp twine, scissors
Techniques: hand stitching, machine stitching, ink distressing

Friday, March 18, 2011

Flourishes Speed Challenge

Tonight was Flourishes' March Release Party on SCS. It was a fun time (I won a $10 gift certificate to use in the Flourishes store. Yippee!!), and I'm just loving this release!! During the party, Flourishes revealed their first-ever Speed Challenge. It's a sketch (shown below) and the winner could nab the entire release. I know, right? The catch is that it must be posted to the Flourishes blog within 12 hours of the end of the release party--that's 10 a.m. Central Time on Friday, March 18. It's past my bedtime, but I zoomed to my stamping table and threw this together.
It's not my most polished (and it's too late to get very creative with this sketch! No thinking out of the box here), but I think it will do nicely as one of my birthday thank you notes!

Here's the sketch we were to use:
I'm also playing along with Papertake Weekly (to use 3 of something--I used 3 rhinestones) and Delightful Challenges (show some green).

Thanks for taking a peek at what's making me happy today in the middle of the night. See you again soon!

Card Recipe:
Stamps: Flourishes A Year in Flowers, Calendar Set #1; Flourishes Peaches and Cherries (sentiment)
Paper: SU certainly celery CS, MFP CS, BasicGrey Kioshi DP, Canson watercolor paper

Ink: Palette noir black, Ranger tea dye distress ink, various inks for watercoloring
Accessories: Fiskars 2" circle punch, SU scallop circle punch, SU scallop border punch, SU small oval punch, watercolor brush, foam tape,sponge dauber,sheer ribbon, rhinestones
Techniques: watercolor painting, ink distressing

Thursday, March 17, 2011

StampinB Spring-Colored Thanks

Another Thursday brings another Stampin' B's DT Challenge!! I am honored to be the challenge hostess this week. My challenge is to create a thank you card using spring colors--the added twist is that one of the colors must be PINK. Let's meet today's card:
Daffodils have a special place in my heart because they are my birthday flower! This gorgeous daffy image is from Flourishes, and I had the best time using my favorite coloring technique: watercolor painting with inks. Yay! That's always so enjoyable. I thought that a pink, yellow, and celery color scheme would be just right for this spring thank you note. The yellow and pink ledger paper DP in the background is from Pink Paislee's Sweetness collection. The yellow lace is vintage stuff from the sewing box I inherited from my Gramma.

I incorporated several additional challenges into this card:
I hope you've been inspired to play along with the Stampin' B's!! If you do make a card, post it on your blog or SCS gallery, and link it up to the Inlinkz tool on the Stampin' B's blog. We'd love to see what you create!! :)

Thanks so much for stopping by to check out my little slice of bliss for today!

Card Recipe:
Stamps: Flourishes A Year in Flowers, Calendar Set #1
Paper: SU regal rose CS, SU certainly celery CS, Pink Paislee Sweetness DP, Canson watercolor paper

Ink: Palette noir black, various inks for watercoloring
Accessories: EK 2.25" circle punch, MS topiary border and corner punches, SU scallop trim border punch, SU jewelry tag punch, watercolor brush, foam tape, vintage lace, buttons from my stash, embroidery floss, Sandylion butterfly sticker
Techniques: watercolor painting

Monday, March 14, 2011

A Heart-y Birthday to You!

Happy Monday, everyone! I hope you had a fabulous weekend. We were busy, busy, busy. And then the time change hit!! I hate how that throws everyone off. I'm pretty sure it will take a week or so for all of us to get all the time kinks worked out.

So, how busy, busy, busy were we? Let's see . . . Friday evening DD had Girls Scouts, then we had our homemade pizza night (DH makes one mean hand-tossed pizza from scratch. Out of this world!), and a movie with the kids. Saturday morning DH and I updated our finances while the kids worked on homework. DD and I wrapped up her Girl Scout troop's cookie sale by counting up the cookie money turned in by her fellow Scouts and getting a deposit slip ready. After lunch, it was off to the bank to make the deposit. Her troop did an outstanding job! Now they are all set to go camping later in the spring.

Once the cookie money was safely deposited, the kids and I headed to the mall. They had more freebie coupons to spend at Build-A-Bear Workshop! Last month they had each received a coupon for a free bear accessory (up to a $5 value). This month DD received two free accessory coupons, and DS received a coupon for a free accessory AND a coupon for a free bear (up to $12). I know--crazy, right? They had a best time picking out their free stuff. And as we were leaving BABW we passed a stand that some nice folks from Chik-Fil-A had set up giving shoppers the chance to "spin the wheel" for free food and drink items from Chik-Fil-A. We each got a turn! Both DD and DS got coupons for free hand-spun milkshakes, and I got a coupon for a free soft-serve vanilla ice cream. Not ones to let free stuff lapse, we immediately headed over to the food court to cash in. What a yummy, well-timed snack. And nothing tastes sweeter than free! Then it was off to the family-friendly Spring Fling dance at our church (it's always such fun and our kids look forward to it for weeks). Completely exhausted, our kids collapsed in bed shortly afterward. DH and I caught an on-demand movie (Date Night) and double-checked all our clocks before collapsing ourselves.

Whew! So, on Sunday afternoon I finally had the chance to restore my sanity with a little papercrafting while DH helped DD get started on a building project she's doing for science class and supervise DS's computer programming efforts (that child just started learning it program in Python and, man, is he gung ho!! And understanding a surprising amount of it). Here's what I made:
I wrapped some of my favorite challenges into this card:
Thanks for hanging in there with my looooooooooooooong post today. See, I told you it was a busy weekend!! I'm so happy you dropped by to check out my little slice of bliss. :)

Card Recipe:
Stamps: {ippity} Party Hat Wishes
Paper: SU pacific point CS, SU regal rose CS, textured CS by DCWV,
MFP snow storm CS, SU pacific point DSP
Ink:
SU pacific point, Palette bella rose
Accessories: EK 1.5" square punch, sewing machine, white canvas from my stash, Pink Sprinkles Smooch Spritz, scissors, foam tape
Techniques: machine stitching, misting, canvas


PS Want a chance for some excellent blog candy? Check out this new Ribbon Carousel!
For more info, see THIS post.

Monday, March 7, 2011

More Funny Buttons

I couldn't resist making another card for today's SCS CAS challenge (theme: humor). I just couldn't keep this "A stitch in time . . . keeps the buttons from falling off!" out of my head today!
This time I used the colors from the Off the Wall Craftiness Challenge #48,
and the sketch from this week's Waltzingmouse Sketch Challenge #37:
Thanks for taking a look!
Emily

Card Recipe:
Paper: SU bermuda bay textured CS, SU so saffron CS, snow storm CS, DCWV pink CS
Ink: Marvy LePlume II black marker
Accessories: MS loop PATP, CM corner rounder punch, scoring tool, embroidery floss, needle, foam tape, sewing machine, buttons from my stash, Websters Pages Bloomer (aqua)

Keep Yer Buttons On!

Today's CAS challenge on Splitcoast is "Tickle Your Funny Bone." I just had to play along with this week's humor theme!
This sentiment--"A stitch in time . . . keeps the buttons from falling off!"-- *always* makes me chuckle. :D And what a fun card to make--I got to play with my button stash AND my baker's twine from The Twinery!!

I took my colors from Mona Pendleton's Create For Fun challenge, CR84FN18: orange, yellow, and kraft.
We had a super busy but extremely enjoyable weekend. I want to tell you about the fun we had on Saturday, but first a little back story. My 8YO son is an avid Cub Scout. Each fall his Pack holds its big fundraiser for the year: selling Boy Scout popcorn. This year his Pack added a new selling incentive: each cub would get Cub Cash, a credit equivalent to 20% of his popcorn sales, to use toward paying for various Pack activities (like camping, outings, etc.) during the program year. Saturday was Scout Day at a New Hampshire ski area (about 75 miles from us) and DS's Pack chose that as the March outing. We don't ski, but snow tubing is another option at this ski area, so we decided to give it a try. DS had enough Cub Cash to treat all four of us to four hours of snow tubing!! Wasn't that sweet of him? It was a blast. The weather was perfect: clear blue skies with an air temperature of almost 50F so we stayed toasty, but there was plenty of snow on the ground. Zipping down those nicely groomed lanes on our inner tubes was quite a thrill, and we all loved being towed up the hill in our tubes by the lift. It was our first snow tubing experience but definitely won't be our last. DS is already talking about selling enough popcorn next fall so we can do it again!

I hope you had a fabulous weekend as well!!

Thanks for checking out my little slice of bliss for today!
Emily

Card Recipe:
Paper: kraft cardstock
Ink: SU tangerine tango, Palette noir black, Ranger tea dye distress ink
Accessories: CM corner rounder punch, sponge dauber, buttons from my stash, needle, LemonDrop and Mandarin baker's twine from The Twinery

Saturday, March 5, 2011

Another for St. Patrick's Day

Yesterday's Splitcoast Free for All Challenge to use your good luck charms, greens, and leprechauns was perfectly timed for adding to my {small} collection of St. Patrick's Day cards. Here's another one that I put together.
A blogging and SCS friend, Bonnie Klass of Stamping with Klass, has what she calls a "UFO box," her term for her collection of UnFinished Objects, and she often describes part of a card she's made as having been rescued from her UFO box. What a great idea!! After I read about that for the first time, I started my own UFO, well, . . . pile . . . on my stamping table. And sometimes I add images that, for whatever reason, just aren't quite right for the project I'm working on. But there really isn't anything wrong with them, so into the UFO . . . pile . . . they go. This bouquet of shamrocks image was rescued from my UFO pile (added a few weeks ago while working on this card). I thought it would work well with CPS Sketch #207.

Here are a few more challenges I piled on for this card:
OK, so that wraps things up for now. Thanks for dropping by!
Emily

Card Recipe:
Stamps: Flourishes Irish Blessing
Paper: MFP snow storm CS, MFP lily pad CS, The Paper Company
Ink: Versamark, Palette virdian leaf
Accessories: MS modern garland border punch, SU 0.5" and 0.75" circle punches, Stampin' Pastels, sponge applicator, buttons from my stash, gingham ribbon, rhinestones, safety pin
Techniques: Poppin' Pastels

Friday, March 4, 2011

Color-Splashed St. Patrick's Day

I'll be heading out to help in my son's classroom in just a little bit, but I wanted to share this clean and simple St. Patrick's Day card that I made this morning.
I was inspired to play along with today's Splitcoast Free for All Challenge, Got a Lucky Penny?--to use your good luck charms, greens, and leprechauns for this challenge. The timing on this challenge was just right--I won't need many St. Patty's cards, but I've only made one so far this year, and we are less than two weeks away! And I decided that a St. Patrick's Day card would be the perfect opportunity to play along with the new Play Date Cafe challenge: "Player's Choice" Color Splash Week! The idea is to make a black and white card with just a splash of a single additional color, and this week we get to choose whatever color we'd like. Obviously, I chose to add a splash of GREEN!!

I used two little shamrock charms from a bulk bag of pastel-colored buttons that I purchased several years ago. I arranged three green heart-shaped gems and a bit of green embroidery floss as a third "lucky charm."

Here are the challenges I incorporated into this card:

Thanks for stopping by to check out my little slice of bliss today! Have a super weekend!

Emily

Card Recipe:
Stamps: The Angel Company (shamrock image and sentiment); SU Baroque Border wheel
Paper: MFP snow storm CS, MFP black CS
Ink: SU basic black, Palette viridian leaf
Accessories: SU designer label punch, EK 1" square punch, foam tape, shamrock charms, green heart rhinstones, green embroidery floss, peapod baker's twine from The Twinery

Thursday, March 3, 2011

StampinB 100th Challenge

A new Thursday brings a new Stampin' B's DT Challenge!! This week we are celebrating our 100th challenge, and challenge hostess Joanne says, "Strike up the band!" Her challenge to us is to create a project using something music related. I had the best time taking on this challenge and so, without further ado, let's meet my card. Ta-da!!
You probably can't take your eyes off my funky and fabulous felt bird, right? This sweet feltie was a prize I won at Get Sketchy last fall and comes from the cute Etsy shop Crafty Paper Girl. I couldn't wait to use it on a card, and today's StampinB challenge was perfect!

The sheet music behind my felt bird was taken from a vintage hymnal I bought last year at a local used book store expressly for deconstructing to use in papercrafting projects. And I was so pleased to dip into my droolworthy Pink Paislee Sweetness pad for the background DP.

Challenges that inspired this card:

I hope you've been inspired to play along with the Stampin' B's!! If you do make a card, post it on your blog or SCS gallery, and link it up to the Inlinkz tool on the
Stampin' B's blog. We'd love to see what you create!! :)

Thanks so much for stopping by to check out my little slice of bliss for today!

Recipe:
Paper: SU chocolate chip, SU bashful blue, Pink Paislee Sweetness DP, page from a vintage hymnal
Ink: Ranger tea dye distress ink, Palette haystack, SU chocolate chip
Accessories: MS poinsettia chain punch, SU jewelry tag punch, sponge dauber, Crafty Paper Girl feltie, foam tape, heart charm, brown burlap string, sewing machine, rhinestones
Techniques: machine stitching, ink distressing