The little things that make me happy here on Bliss Road~~Emily Keaton
Showing posts with label grid. Show all posts

Wednesday, April 9, 2014

Happy Easter Eggs

Welcome to another beautiful day here at My Little Slice of Bliss! Today the DeNami Design Team is sharing designs over on the DeNami Design blog that show off the stamp in this week's Product Spotlight: F160 Happy Easter.


Recently, my hubby gave me a set of egg-shaped dies, and I couldn't resist using them for a trio of Easter-egg themed cards for today's Product Spotlight! Here's what I created:


A pair of egg-shaped cards! I used only two stamps on both of these: Happy Easter and Elegant Word Plate, but I amped up the "festive factor" with lots and lots of washi tape from the DeNami Design store.

DeNami products: Purple/White dots, Green Stripes, Yellow/White dots, Pink Stripes washi tape and baker's twine from the Confetti Twine 3-pack


DeNami products: Lime/White dots, Pink Chevron, Teal Chevron washi tape

I also tried a standard A2-sized card using another of my new egg-shaped dies. I was trying to recreate the look of this purple Faberge-style egg. To do so, I embossed my egg diecut with my Wire Fence Embossing Folder from the DeNami store, and rubbed a metallic gold ink pad across the raised embossing to give it a gilded look. Then I embellished each point of intersection in the design with liquid pearls.


You can see the sheen of the pearls a little better in these two photos:


Be sure to check out the rest of the team's lovely creations today on the DeNami blog. Like what you see? Then you can score a great deal on this beautiful Happy Easter sentiment--as our Spotlight Product, it's on sale at 10% off for the next week!!

Thanks for stopping by today!
Emily

Thursday, November 14, 2013

Winter Wonderland Notepad

Good Thursday morning to you, my friends! I'm so very pleased to be sharing my first holiday project as part of the Purple Onion Designs Holiday Design Team! This year I've vowed to make as many as the gifts that my family will be giving as possible. Today's project will be perfect for one of my son's fifth-grade teachers. It's a decorated note pad, created entirely with Purple Onion Designs stamps. Here's a look at the front cover I designed for it:


And now here are a few peeks at the pad I made to fit inside:


Yes, I made that little notepad inside myself! And it's actually super easy to do. First, I cut sheets of printer paper down to size (3" by 4") and then stamped each page with Carolyn Draws' Doodle Grid from Purple Onion in light pink ink. Next I went back and stamped each sheet with both snowflakes from POD's Snowflake Set in turquoise chalk ink.


When everything was dry, I simply stacked up the notepad pages, stacked them on a piece of tag board cut to size as a backing, and then applied four coats of PVA bookbinding glue along the top edge of the pad to adhere all the pages together. (Allow each coat of PVA glue to dry between applications.) All that was left to do at that point was create a cover and mount the pad inside. Done!! Additional Purple Onion stamps that I used for this project: Holiday Border Tape Set (on the front cover), Handwritten Holiday Set (inside), and the medium label from the Plain Jane Labels Set (inside).

Purple Onion Designs just released another collection of holiday stamps and stamp sets. And may I say that they are all fantastic! Here's a peek at one of my favorites, called This is December:

This_Is_December_Set_-_web

Awesome, right? And how about this cute set? This is Holiday Sweets:

Carolyn_Draws_-_Holiday_Sweets_Set_-_web


You can see the entire release right HERE. You should go check them out!!

Oh, and Michele has also added a new mounting product called Tack 'n Peel to the Purple Onion Designs website. It's a cling sheet that is perfect for adhering to acrylic block handles for unmounted stamps. I've put this on my wishlist!! The link includes a video on how to use it, along with tips on other methods for stamping with unmounted rubber stamps. Lots of great information here!!

Thanks so much for stopping by to take a look at my holiday project today!
Emily

Wednesday, August 21, 2013

August Pinspired at DeNami

Hello, friends! Today I'm bringing you another Pinspired post along with a few of my other DeNami Design teammates. This month we were inspired by this photo:


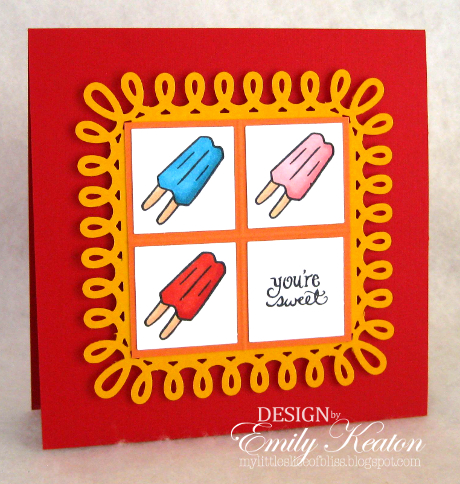
I was inspired by all those Popsicle sticks and immediately reached for the DeNami Popsicle stamp! I was also careful to pick up all those bright summer colors, too.


I used a variety of DeNami cardstocks (red, golden tangerine, desert orange, and white), Tuxedo Black Memento ink, and the "you're sweet" sentiment from DeNami's Love Sentiments stamp set.

Be sure to check out what the other designers did with this inspiration photo on the DeNami blog today!

Thank you so much for dropping by!
Emily

Wednesday, March 20, 2013

March Pinspired at DeNami

Welcome to Wednesday! Today I'm bringing you another Pinspired post along with a few of my other DeNami Design teammates. This month we were given this lovely photo as a prompt:


I couldn't take my eyes off that luscious white-chocolate rabbit and lamb. Yum! I also took in the Easter grass and the pastel colors. My inspired result? This:


Here are the DeNami products I used to make this card:
Grass Border
Small Happy Easter
Bunny Border
Farm Animals set
Celery cardstock
Petal pink cardstock
Aloe vera ink
DeNami boutique button
Pastel baker's twine
Crystal lacquer pearl pen

Curious to see what the other designers did with this inspiration photo? Be sure to check out the DeNami blog today!

Thanks so much for visiting today! May you have a day filled with bliss!
Emily

Wednesday, January 23, 2013

Nuts About You

Today I am celebrating L-O-V-E (and, apparently, squirrels) with this little card.


I used the latest DeNami Design Product Spotlight stamp. This week we are featuring the brand new Nuts About You stamp set. Isn't it utterly adorable?


I also used the brand new DeNami Design Squirrel stamp, Teeny Heart Background, lavender card stock, amethyst card stock, brown kraft card stock, Rich Cocoa Memento ink, and Spring Pansy Versamagic ink to make this card.

I love looking for inspiration for my creations in the stuff of my everyday life. I was reading our February issue of Family Fun magazine last week when I was struck by the table of contents page, thinking it would make a great layout for a square card.


I thought the tiny images from this week's Spotlight set would be the perfect scale for giving this idea a try. I had to flip the sketch a bit to make it work with my images, but I like how it turned out. It ended up measuring4.25" x 4.25".

Now, WAIT!! Don't go yet! The DeNami Design team has always done two Product Spotlights each month. This term we are shaking things up a bit ;-). We are still doing two Product Spotlights, but the second spotlight of each month will be done as a DT blog hop! And what's a blog hop without a prize? You can comment to win the Spotlight product! And this month that means you could win this adorable Nuts About You stamp set :). All you need to do is hop along to each stop in the lineup, leaving comments along the way. Here is the blog hop lineup:

DeNami blog 
Lisa Petrella
Deb Wabbe
Wendy Elliot
Emily Keaton  <==== you are here!
Lisa Elton
Kanani Kawamura
Dana Seymour
Tammy Hobbs

One commenter will be selected at random to win this month's prize! But don't worry--if you don't win, you can still snatch up this sweet stamp set for 10% off during the next week.

Thanks for stopping by today! It was great having you visit!
Emily

PS I'm playing along with the Playing in Paradise Challenge #100, which has the theme of " Let's Celebrate"  this week. I am celebrating LOVE!!

Tuesday, June 12, 2012

10-Minute Nurture Yourself

So, I mentioned on Sunday that I was waiting to pick up my daughter from her Girl Scout camping trip. Well, she returned safely and had a great time, but came home with a few hitchhikers. Three to be exact:  deer ticks. You know, the tiny kind that can carry Lyme disease, and we live in--you guessed it--prime Lyme territory. We removed them successfully (with tweezers, the best method according to the Centers for Disease Control and Prevention. There are a lot of folklore removal methods out there, but some can actually increase the likelihood of disease transmission {something to do with increased salivation; I know, ewwwwwwwww!}. Our motto: when in doubt, yank it out!). Anyway, I consulted with our pediatrician yesterday, and because we have no way of knowing if the ticks were attached for less than 24 hours, we'll have her tested for Lyme disease in four to six weeks. (Yeah, it takes that long for it to show up in tests!) In the meantime, we'll keep our eyes peeled for that telltale bullseye rash, which apparently presents in only 60% of Lyme disease cases, so testing will be crucial. Our pediatrician mentioned that the practice has been seeing a lot of Lyme disease recently, most likely due to our very mild winter. Darn, and I was kind of liking that! I guess I'd better hope for lots of cold, snow, and ice next year!

Enough of the yucky stuff, let's get on with a card!

Today I am sharing, appropriately enough, a get well card! I realized last week that my supply of such cards has been depleted, so it was time to re-stock. Because I've been so time-crunched, I decided to play along with Flourishes' Gimme Ten challenge again, to make a 10-minute card.

I used three sets from Flourishes to put together this card: Sunflowers, Tiny Flowers and Tags, and From the Garden. I made a super-quick background by scoring a 3.75" x 3.75" piece of cardstock in a grid and stamping a tiny daisy in each square. I already had that handmade spiral fabric flower in my stash, and all that was left to do was quickly stamp and trim a few leaves. Done! I'm linking this up as my final entry in Julie Koerber's Celebrate Five challenge.

I also used some more Bazzill Card Shoppe cardstock to make this card. Today's colors are Peanut Cluster (for the card base), Gumball (for the blue scored panel), and Easter Grass (for the leaves). I am so impressed with how will this cardstock scores: nice crisp lines and no danger of accidentally perforating the paper. And even though this is nice heavyweight cardstock (100 lb.), I had no trouble fussy-cutting those leaves, although I admit I wasn't going for precision here. It is, after all, a 10-minute card!

Well, I already have dinner in the crockpot, and the kids are off to school,  so it's time to get cranking on my freelance work for the day. Thanks so much for stopping by!
Emily

Stamps:  Sunflowers, Tiny Flowers and Tags, and From the Garden by Flourishes
Paper: Peanut Cluster, Gumball, and Easter Grass from the Bazzill Card Shoppe collection; white from Papertrey Ink
Ink: Versafine Spanish Moss, SU Bashful Blue
Accessories: handmade rolled fabric flower, pearl, SU label punch, scoring board, baker's twine from the DeNami Design Spring Twine 3-pack, Corner Chomper
Techniques: scoring, rolled ribbon flower
Friday, April 27, 2012

You're Special (and a photo tutorial)

A very happy Friday to all of you! Thanks so much for dropping by.

As some of you may know, I tend to take a budget-minded approach to my papercrafting. Rather than invest in pricey alcohol-based markers for coloring stamped images, I've had a lot of fun exploring cheaper options for coloring, including watercolor painting with dye inks (you can find my photo tutorial here) and coloring with colored pencils. When I first started using colored pencils, I was disappointed by how you could see pencil lines in the colored areas, often with white areas showing through. It wasn't long, though, before I discovered "Gamsol magic," a method of blending colored pencil coloring with odorless mineral spirits (OMS) and paper blending stumps. ("Gamsol" is an OMS brand name, just like "Band-Aid" is an adhesive bandage brand name.) OMS is a painting solvent that evaporates completely and leaves behind no residues. It dissolves the wax in colored pencil lines so that the pigment may be lifted and spread. OMS blending of colored pencil coloring allows nearly effortless shading and results in a beautiful, smooth finish.

For the sake of comparison, the chickie on the left (below) was colored with colored pencils only, but the chickie on the right was colored similarly then blended using OMS and a paper stump. See how much smoother and more even the coloring is? The colors even seem more vivid!

The new cling-style Computer Chickie stamp from DeNami


Anyway, the reason I'm sharing all of this information about colored pencils and the OMS blending technique is because I have a new photo tutorial on this technique debuting over on the DeNami Design blog today. In it I show how I did the coloring to make this card:


Isn't that DeNami Armchair Chickie the cutest? I thought this would make a cute card for Father's Day! I stamped the "You're special" sentiment from the Thoughtful Greetings stamp set on the outside and the new cling-style Happy Father's Day stamp on the inside. The patterned paper is from the new Handmade collection by Lily Bee Designs.

Now before I go, I wanted to share a few more tips on materials for this technique that I wasn't able to include in my tutorial on the DeNami blog.
  • Look for odorless mineral spirits in the oil painting supply section of your favorite craft and hobby store. You can look for Gamsol or any odorless paint thinner containing 100% odorless mineral spirits. I was able to get Mona Lisa brand for an awesome price at my local A.C. Moore store.                  
  • Rather than juggle a huge container of OMS in my crafting space, I pour a more manageable ounce or two into a small lidded glass moisturizer container to keep handy on my work table. OMS is flammable, so be sure to keep it covered tightly.
  • You can find paper blending stumps in most arts/crafts stores; look in the fine arts supplies with the graphite pencils, charcoal, and pastels. They look something like this:
  • The paper stumps are pretty cheap, and the double-ended stumps give me even more bang for my buck. So I dedicate one stump tip per color to avoid unintended color mixing. What happens if the tip wears down? You can sharpen it again quite simply with a sanding block or emery board.
I hope that I've been able to take some of the mystery out of the so-called "Gamsol magic" technique in today's post and that you'll take a peek at my tutorial on the DeNami blog.

Thanks for taking a look. Have a great weekend!
Emily

Monday, February 6, 2012

New DeNami Challenge

Today I'm sharing a card I created for the new DeNami Design Challenge that debuts today over on the DeNami Design blog. The challenge is to use at least one DeNami Design stamp and this sketch:

It's a fun one! Here's my card:

I'm having such fun with my DeNami Valentine stamps! I used the Valentine Chickie stamp, the Small Scallop Heart stamp, and the "XOXO" and "Be mine" sentiments from the Love Sentiments stamp set. I also used these products from the DeNami store: Versafine Onyx Black ink, white cardstock, red cardstock, and EK Success Dotted Scallop border punch. I used colored pencils to color in my sweet little chickie.


I hope you'll take some time to play along with the DeNami Sketch Challenge this month! You have until Monday, February 27. Can't wait to see what you create. :)

Thanks for stopping by,
Emily

PS I'm entering this in the Animal Antics Challenge over at Simon Says Stamp.

Friday, February 3, 2012

Sweet Love for FWF

TGIF!!

Welcome to Friday and a post for Unity's Friends with Flair. Want some Unity/{ippity} inspiration? Just hop along with Unity fans for some fabulous projects and a chance to win some sweet Unity rubber! (You'll find a complete list of FWF hoppers on the Unity blog.)

Today I've got another Valentine for you--using all {ippity} stamps: the Dots for Sure background and the truly sweet "sweet love" sentiment from Moon Beam & Heart Strings.

I used the sketch from the new Chick Challenge {with Ippity} #16 for my design,and I chose my colors based on GoFish Challenge #10.
I'm also entering this in the {ippity} Love challenge (to use red, pink, hearts, etc.) and the Paper Sundaes Valentine challenge.

Finally, this is my entry for The Punches Challenge in the Moxie Fab World, in which Cath challenges us to use punches in an innovative way. No, no--stop looking at those heart punches. Nothing innovative there!! My "innovative" take on punches is that I made my little pennant banner using a large star punch to punch a star

and then snipped off one of the star's points: instant pennant!

Just string them up, and you have a sweetly sized banner. :)


I've got a busy day ahead--many errands and loose ends to wrap up! The whole family is going to a hockey game (Merrimack College v. Boston University) tonight; it's a Cub Scout family outing for my son's pack. He "paid" for all of our tickets using the Cub Cash he earned from selling Cub Scout popcorn last fall. We know next to nothing about hockey, but we're geared up to have a great time! Just need to do a little boning up on the rules before we head out tonight . . .

Have a SUPER weekend!! Thank you so much for checking out my little bit of paper bliss today!
Emily

Monday, January 9, 2012

DeNami Anything Goes Challenge


Today a brand-new theme challenge is going live over at the DeNami blog, and this is an easy one: it's an ANYTHING GOES challenge! All you have to do is use at least one DeNami stamp, and you are golden ;). You can check out all of the details HERE.

Here's my card for the challenge:

Aren't those DeNami Owls the cutest? I also used the coordinating You're a Hoot sentiment. I stamped both in Vintage Sepia Versafine ink, which is perfect for watercoloring.

I was inspired by the fabulous numbers (as well as the stitching and the idea of a quilt--although I went with "patches" on mine!) in this new Tuesday Trigger Challenge photo over at the Moxie Fab World:
They reminded me of some fun number patterned paper I've had in my stash for a while (which I believe is from The Girls' Paperie). Definitely time to pull it out and put it to good use! And the numbers are perfect for a birthday card, which is what this card is destined for. It (well, actually its twin--I made two) will be on its way for my uncle's birthday later this month.

I'm also entering this in
the Simon Says Stamp "New Something" challenge (my "new" is using something new: my "You're a Hoot" stamp!).

I hope you'll take some time to play along with the DeNami Anything Goes Challenge this month! You have until Monday, January 30. Can't wait to see what you create. :)

Thanks for stopping by,
Emily

Thursday, December 15, 2011

Ornament Grid Thank You

My Christmas cards are all sent, so now I'm focusing on making Christmas thank you notes!
I made this card for the second Flourishes December Release Week noontime challenge: the Perfect Pear Challenge, a which is a color challenge to use light green, deep rose, and cream.
I used Stampin' Up's Certainly Celery and Rose Red cardstocks and inks, along with a bit of cream-colored cardstock for my label.

I scored a grid on some white cardstock and filled each grid square with a stamped ornament from Flourishes' All That Glitters set. The sentiment comes from Flourishes' Tag Lines set.

Making a grid like this is one of my favorite techniques for using smaller stamp images. Quick and easy, but lots to look at!

Thanks for stopping by!
Emily